30日間の無料評価版をお試しいただけます。

Versions Compared

Key

  • This line was added.
  • This line was removed.
  • Formatting was changed.
Comment: Migrated to Confluence 4.0

...

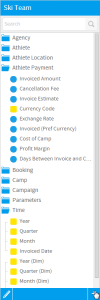
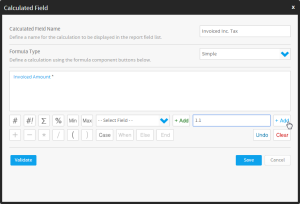
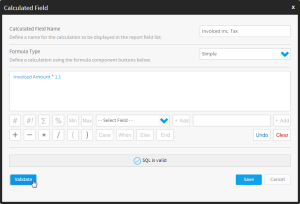
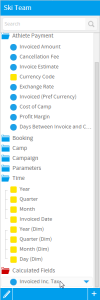
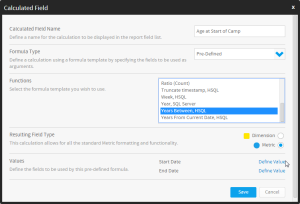
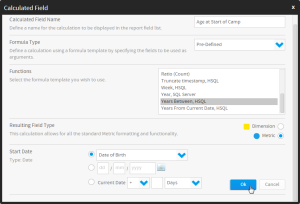
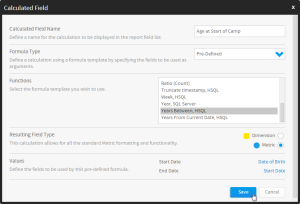
Calculated fields allow you to create basic calculations with the fields available in your report.
Note: a calculated field that you create in the report builder cannot be used across multiple reports. It is unique to your report only. If you create a set of calculated fields you wish to use across multiple reports you can either:

  1. Request the calculations to be included in the View by your administrator or
  2. Copy the report containing the calculations using the copy function - the copied report will contain the new calculated fields as well.

...

Expand
titleClick to view instructions...
  1. Click the + button at the bottom of the field list in the Data step of the report builder.
  2. The Calculated Field window will now appear. You will need to define the following:
    1. Provide a name for your formula in the Calculated Field Name box. This will be used as the field name in your table and/or chart output.
    2. Select Simple from the Formula Type drop down list.
    3. Use the formula buttons and field drop down list to add components to your calculation. You cannot type directly into the calculation area of the window, each part of the formula needs to be added using buttons. Yellowfin will not permit you to select combinations of variables that are incompatible - therefore options that are greyed out will become active as you add in elements.
      Note: if you wish to type your calculation you may need to use the Freehand SQL option discussed later.
  3. Once finished click the Validate button to ensure your calculation is not missing any components.
  4. Click Save to complete your calculation. It will now be available in a folder called calculated fields at the bottom of the field list in the Data step.

...

Expand
titleClick to view instructions...
  1. Click the + button at the bottom of the field list in the Data step of the report builder.
  2. The Calculated Field window will now appear. You will need to define the following:
    1. Provide a name for your formula in the Calculated Field Name box. This will be used as the field name in your table and/or chart output.
    2. Select Pre-Defined from the Formula Type drop down list.
    3. Choose the formula you wish to apply - the selection is specific to the type of database that your data is sourced from.
    4. You will now be provided with options to complete your calculation. Click on each parameter to define it.
    5. Provide a value using one of the options provided. These will vary depending on the type of value required.
  3. Click Save to complete your calculation.
  4. Your calculation will now be available in a folder called calculated fields at the bottom of the field list in the Data step.

...

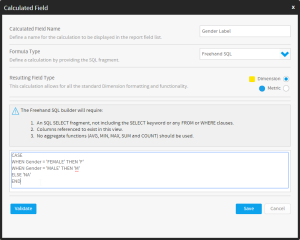
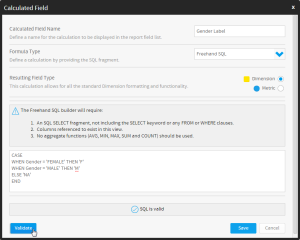
If you have SQL skills you may wish to write your SQL directly into the SQL edit box. In this case select the 'Enter SQL' ‘Enter SQL’ option from the formula tab. This will open the SQL edit box.
Insert the SQL you wish to create your column.

Expand
titleClick to view instructions...
  1. Click the + button at the bottom of the field list in the Data step of the report builder.
  2. The Calculated Field window will now appear. You will need to define the following:
    1. Provide a name for your formula in the Calculated Field Name box. This will be used as the field name in your table and/or chart output.
    2. Select Freehand SQL from the Formula Type drop down list.
    3. Enter the SQL use wish to use to populate the field.
      Note: The Freehand SQL builder will require:
      1. An SQL SELECT fragment, not including the SELECT keyword or any FROM or WHERE clauses
      2. Columns referenced to exist in the view
      3. No aggregate functions (AVG, MIN, MAX, SUM, and COUNT) should be used.
  3. Once finished click the Validate button to ensure your calculation is not missing any components.
  4. Click Save to complete your calculation. It will now be available in a folder called calculated fields at the bottom of the field list in the Data step.

...