Overview
The Report format tab contains a number of sections that you can use to format you report. Each of these sections is described below.

Report Actions
The Report section of the format tab will let you save and activate a report using the save drop down menu, delete or copy a report.

Report Menu
This menu allows you to Save, Copy, Delete, and Reset the Format of the report.
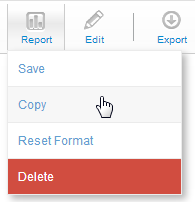
Save
Whenever a report is edited or created it will go into DRAFT mode. Draft mode stops the report from being accessed by any other user while you are editing the report.
To make the report available to other users or permitted collaboration options such as emailing to alternate users you will have to Save or ACTIVATE the report.
Option |
Description |
|---|---|
Name |
Enter the meaningful name for the report |
Description |
Provide a description for the report to assist users with understanding the purpose of the report and its content. |
Category |
Select a category to save the report into so that users will be able to navigate to it via the report list. You will only be able to select categories for which you have save access rights to. |
Sub Category |
Select a Sub-category to save the report into so that users will be able to navigate to it via the report list. The subcategory may have security and refresh settings applied to it that will effect what can be done with the report with regards to scheduling and access. |
Tags |
Allows you to apply tags to your report |
Activate |
To activate your report - take it out of DRAFT mode you will have to click the Activate button. |
Copy
Click to create a copy of the report that you can manipulate without making changes to the original.
Delete
Click on the Delete icon to delete the report.
Reset Format
If you have applied format setting but want to return your report to its original state you can click the reset format link. This will remove ALL format options that you have applied. A confirm box will open to ensure this is what you want to do.
Note: this only applies to formatting options such as fonts, column format, table formats, and title format. This will not clear conditional formatting and grouping settings.
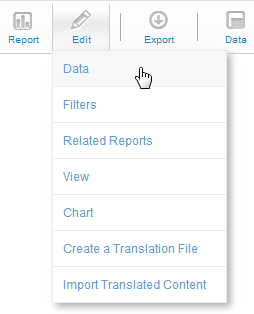
Edit Menu
The edit drop down allows you to return to any step in the report building process, including Report Data, Filters, Related Reports, Preview, Chart, and even the View.
Export
Using the Export menu you can export your reports in a number of formats. These include printing your report, exporting it into a PDF format or exporting the data into Excel / CSV (Comma Separated Values).

Table Format
The table format option allows you to change the styles that will be applied to your entire data table.

Data
Option |
Description |
|---|---|
Style |
To format the data values contained in your report select the custom style option and apply the font, size etc that you wish to use. |
Row Shading |
Selecting Alternating row shading will change the shading for every second row of data in your table report. |
Colour |
Choose the colour you wish to apply for the alternate row shading. |
Highlight Colour |
Row Highlights - this changes the row colour as a mouse rolls over it making it easy to identify rows in very wide reports. |
Header Lock |
This keeps the Headers of the table (either Column Titles or Row Titles) in place when the report scrolls on the dashboard. |
Column Lock |
This keeps the first column of the table displayed when horizontal scrolling is used on the dashboard. |
Header
Use the Header format drop down to format the table header row of your report. You can either leave it in the default setting or customize to meet your requirements.
Sort
If you wish to apply a compound sort (where more than 1 column is used in the sort logic) use this drop down to select which columns you wish to sort and in which order. For example you may wish to sort by age and then by gender and finally by name.
- In the sort order section select the column you wish to initially order by, and choose if you wish to sort ascending or descending.
- Select the second column and then the third. Yellowfin allows you to include a maximum of 5 columns in a compound sort.
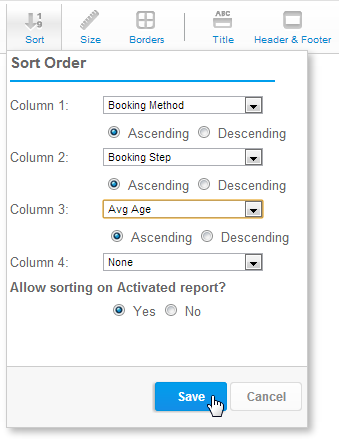
Note: by changing the sort on any column from the report preview screen the compound sort will be deleted.
Size
To change the size setting of the data table use the Size drop down options.
Option |
Description |
|---|---|
Header Height |
To vary the table header height from the default settings change the settings here. |
Row Height |
To vary the table data row height from the default settings change the settings here. |
Width % |
To vary the width of the table change the % settings. 100% is default to 600 pixels to any % change will be relative to this. |
Cell Padding |
Cell padding allows you to set the internal spacing between the cell border and the cell contents (text) The larger the padding the further the text will appear in relation to the border. |
Cell Spacing |
Cell Spacing lets you set the gap between cells. This gives a stronger effect to cell separation. |
Records Per Page |
If you have a very long report you can break the report into smaller pages by setting the records per page limit. For example if your report has 200 records in it and the Records Per Page is set to 50 you will have 4 pages in your report and a scroll option to navigate through them. |
Borders
If you wish to apply a border around your table as well as the settings for that table you can use the border drop down to do so.
Summary - Cross Tabs
If your report data is on a cross tab format you will have an additional option in this section to apply summary totals to your cross tab data. Choose to add either column or row summaries to your cross tab report.
Titles & Display
The titles and display section of the menu allows you to change the settings associated with the report title, description, headers and footers and additional descriptive text such as conditional format details.

Title
Using the title options you can change the settings from default to custom.
Option |
Description |
|---|---|
Title |
To change the style of the Report Title, such as font and colour, use the options provided. You can also choose to hide the Title from the report output. |
Description |
To change the style of the Report Description, such as font and colour, use the options provided. You can also choose to hide the Description from the report output. |
Borders & Shading |
To change the display options for the title background box use the setting provided. |
Header & Footer
To insert page Headers or Footers onto your report select the header and footer format option.
In each of these sections you will be able to either type in free hand text or insert a field. The fields are indicated by buttons:
|
Page Number |
the page number for each page within the report |
|
Title |
the title of the report |
|
Description |
The long description of the report |
|
Date |
The date the report was run |
|
Time |
The time the report was run |
|
Logo |
Add your company logo to the report. This logo will have been pre-loaded by your administrator. |


Display
To display conditional format metadata on a report output select the display options drop down and the relevant information will be printed on the report as well as exported versions.
It also contains options to hide the report from the Report List view, and restrict it from use on the Dashboard.
Summary
This function allows you to create a Report Summary using metrics and dimensions from the report. It can be displayed on the report, dashboard, and mobile.
See Report Summary for more information.
Security, Refreshing, and Information

Security
The security settings allow you to determine if the report is public or private. If public you will have additional security options for broadcast and email settings.
Option |
Description |
|---|---|
Access Type |
Reports can be saved as either Private or Public. The difference between the two options is illustrated below. The ability to save a report as a Public report is determined by your access to Yellowfin. If you do not have access to save Public reports you will only be able to save a report as a Private report.
|
Edit Behaviour |
If the report is a Public Report you be able to set the edit behaviour of the report. The edit behaviour determines what will happen if a user edits the report.
|
Broadcast Enable |
The broadcast options section allows you to set permissions relating to broadcast, subscriptions, emailing and web services. Some or all of these options may be unavailable to you based on your role permissions.
|
Refresh
The refresh cycle will allow the report to be run as a background task on a regular basis. This is used if you wish to run large reports as a background task during off peak periods or if you want to track your KPI metrics on a weekly or monthly basis. The history of each report run will be saved.
Choose the Refresh Option from the Report Menu and set the refresh schedule using the options provided.
Option |
Description |
|---|---|
How to Refresh |
You can choose a number of refresh options:
|
Frequency |
For Periodic refresh use the frequency settings to determine what period and day of refresh you want the background task to run for. |
Advanced Settings |
For Periodic refresh the advanced option allows you to set the time zone and the exact time for the report to be refreshed. |
Information
This option provides you with a popup containing the metadata of the report such as the report definition, column definition and SQL statement being used to generate the data for the report.