Page History
...
| Table of Contents | ||
|---|---|---|
|
...
概要
| Styleclass | ||
|---|---|---|
| ||
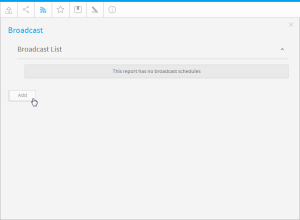
- Ensure your report is Active (not in Draft Mode)
- Click on the Broadcast button in the main navigation menu

- In the Broadcast menu, click the Add button
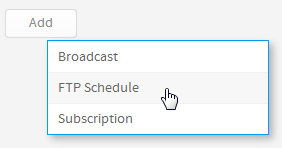
- Select the FTP Schedule option
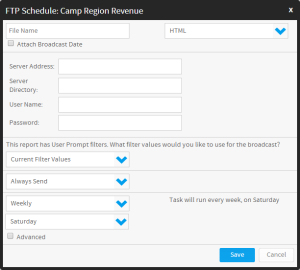
- The FTP Schedule window will open, providing you with the following options:
...
- レポートが有効化されている(ドラフト(編集中)モードでない)ことを確認します。
- メインナビゲーションメニューの「ブロードキャスト」ボタンをクリックします。
- 「ブロードキャスト」メニューで、「追加」ボタンをクリックします。
- 「FTPスケジュール」オプションを選択します。
- 「FTPスケジュール」ウインドウが開き、以下のオプションが表示されます。
ファイル名とファイルタイプ
| Styleclass | ||
|---|---|---|
| ||
- Select the format you wish the report to be sent as, from the list of; HTML, PDF, CSV, DOC, XLS, RTF, and TXT.
- Provide a file name (no file extension required, just the name, eg. SampleReport)
- Tick the Attach Broadcast Date if you wish this to be included in the file name

...
- 送信するレポートの形式を一覧(HTML、PDF、CSV、DOC、XLS、RTF、およびTXT)から選択します。
- ファイル名を指定します(ファイル拡張子は不要です。SampleReportのように名前だけ指定します)。
- ブロードキャストの日付をファイル名に含める場合は、「ブロードキャストの日付を付加」をオンにします。
FTPの詳細
| Styleclass | ||
|---|---|---|
| ||
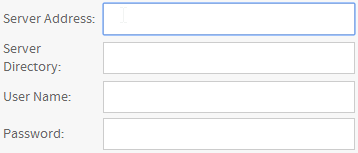
The following details are required to send a report via FTP:
Server Address | This is the address in which the server you are uploading the report to sits |
Server Directory | This is the directory where you want the report to be sent to on the server. |
User Name | This is the username of the server you are trying to access. |
Password | This is the password of the server you are trying to access. |
...
FTPを使ってレポートを送信するには以下の詳細設定が必要です:
サーバーアドレス | レポートをアップロードするサーバーが存在するアドレス |
サーバーディレクトリ | サーバー上でレポートを格納するディレクトリパス |
ユーザー名 | サーバーにアクセスするためのユーザー名 |
パスワード | サーバーにアクセスするためのパスワード |
フィルター
| Styleclass | ||
|---|---|---|
| ||
If your report contains filters you will have the option to select which of these are applied to the FTP Report. The options include:
- Current Filter Values
- Default Filter Values
- Saved Filter Set Values (there will be a list of available sets displayed)

...
レポートにフィルターを含める場合は、FTPレポートにこれらのどれを適用するかを選択できます。以下のオプションがあります。
- 現在のフィルター値
- デフォルトのフィルター値
- フィルターセットの値(使用可能なセットの一覧が表示されます)
配信ルール
| Styleclass | ||
|---|---|---|
| ||
A Delivery Rule is used for exception reporting. If you wish to send a report only if it meets certain criteria (for example: Revenue is less than 100,000) then you will need to add a rule.
- Change the Always Send drop down list to Only if Delivery Rule met
- Click on the Click here to add rule link
- You will now have the choice of building a rule based on:
- If one or more rows match the rule (e.g. is there a transaction less than $1000) OR
- If the totals for the report match the rule (e.g. are the total sales less than $100000)
- Select the field you wish to apply the condition on, click Add, and apply your condition. Click Update to save it. You can add multiple conditions here if required.
- Click Save & Close to apply your condition(s)
- Your rule will now be displayed on the FTP Schedule window

...
配信ルールは特別な目的でレポートを配信するために使用されます。たとえば収益が100,000未満のときのみレポートを配信するような場合に、このオプションを使用します。
- 「常に送信」ドロップダウンメニューを「配信ルールに従う」に変更します。
- 「ここをクリックしてルールを追加」リンクをクリックします。
- ルールを指定する際には以下の2つの基準が選べます。
- 複数のロウ(行)がルール(1,000ドル未満の取引があるなど)に一致する場合、または
- レポートの合計がルール(売上合計が100,000ドル未満であるなど)に一致する場合
- 条件を適用するフィールドを選択して、「追加」をクリックし、条件を適用します。「更新」をクリックして、保存します。ここで、必要に応じて複数の条件を追加できます。
- 「保存して閉じる」をクリックし、条件を適用します。
- これで、ルールが「FTPスケジュール」ウインドウに表示されます。
スケジュール
| Styleclass | ||
|---|---|---|
| ||
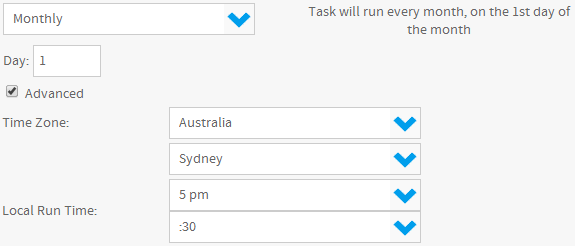
The last step is to define the schedule for your Broadcast
- Select the frequency.
Depending on the option selected here, you may be required to provide further details. For example, if Fortnightly is selected, you will be prompted to select either the first or second week of the fortnight to send in, as well as the day of the week. - Apply Advanced Settings (if required)
Sometimes you may find you need to set the Time Zone, and local time for delivery. This can be accomplished by selecting the Advanced check box and defining the time.
...
最終ステップは、ブロードキャストのスケジュールの定義です。
- 頻度を選択します。
ここで選択したオプションに応じて、さらに詳細を入力する必要が生じることがあります。たとえば、「2週間ごと」を選択した場合は、2週間のうち1週目または2週目のどちらに送信するか、さらに送信する曜日を選択するように求められます。 - 高度な設定を適用します(必要な場合)。
場合によっては、タイムゾーンと配信の現地時間を設定する必要が生じることがあります。これを実行するには、「高度」チェックボックスをオンにして、時間を定義します。
保存
| Styleclass | ||
|---|---|---|
| ||
Click on the Save button to complete the Broadcast set up.

「保存」ボタンをクリックして、ブロードキャストの設定を完了します。
これで、メインメニューでスケジュールを確認できるようになりました。You will now be able to view your schedule through the main menu.
| horizontalrule |
|---|
| Styleclass | ||
|---|---|---|
| ||