Page History
...
| Table of Contents | ||
|---|---|---|
|
...
概要
| Styleclass | ||
|---|---|---|
| ||
Access Filters are used to restrict data based on the user running a report. A manager may only be allowed to see employee details from his or her own department, for example. Access Filters match users within Yellowfin to an arbitrary Reference Id. The Reference Id for the user can then be used as a filter when they run reports.
The steps for setting up Access Filters are:
- Create an Access Filter on the data source
- Assign the Access Filter to a field on a view
- Define a default Access Filter on the view
- Assign an Access Filter to a report
アクセスフィルターは、レポートを実行中のユーザーに基づいてデータを制限するのに使用されます。たとえば管理職にその部下の人事データだけを閲覧させたいような場合があります。アクセスフィルターは任意の参照IDを持つユーザーを検索し、レポート実行時にそのIDをフィルターとして使用します。
アクセスフィルターの設定は以下の手順で行います:
- データソースの上でアクセスフィルターを作成する
- ビュー上のフィールドに対してアクセスフィルターを割り当てる
- ビューに対するデフォルトのアクセスフィルターを定義する
- アクセスフィルターをレポートに割り当てる
アクセスフィルターの作成
...
| Styleclass | ||
|---|---|---|
| ||
- Select source filters on the connection details page. This will make the source filter step available in the wizard.
- Click Add to add in a new filter or edit to edit an existing record. If you click add you will be prompted for the type of filter you wish to create.
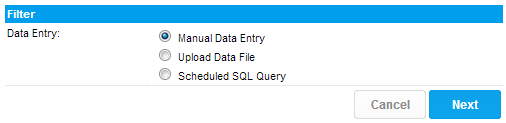
- 「接続の詳細」画面で「ソースフィルター」ラジオボタンを「Yes」にセットします。ウイザードにフィルターのステップが追加されます。
- 既存のフィルターを編集する場合は「編集」を、新しいフィルターを追加する場合は、「追加」をクリックします。「追加」の場合には続いて作成したいデータ入力の方法を選択します。
フィルターパラメーター
...
| Styleclass | ||
|---|---|---|
| ||
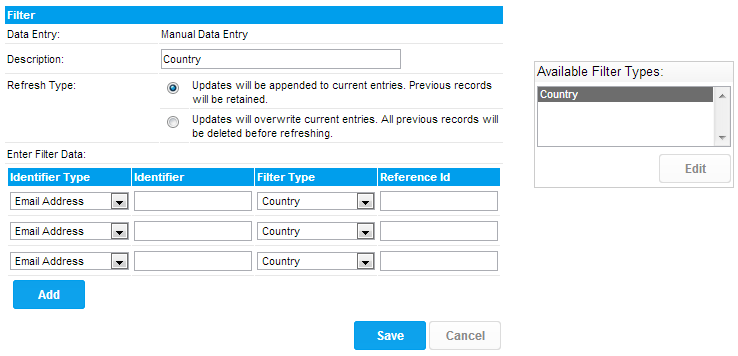
Each Access Filter contains a list of one or more records matching a Yellowfin user to a Reference Id. These can be loaded into the system in three ways: manual entry, from a CSV file, or by running a scheduled query on the source database.
In each case you will need to enter records consisting of four fields:
Identifier Type | The Identifier Type and Identifier are used to identify a Yellowfin user. The Identifier Type can be either |
|---|---|
Identifier | The Identifier field will then be the corresponding user id. |
Filter Type | The Filter Type field is used to determine what type of filter this is. This is critical to assist users when creating views or reports. Select a user friendly type name. |
Reference Id | The Reference Id field is the corresponding data for the matching user. |
...
各々のフィルターは、Yellowfinユーザーを参照IDで識別する1つ以上のレコードを持っています。これをシステムにロードするには、手動、CSVファイルからの読み込み、ベースデータベースに定期的にクエリーを発行するという3つの方法があります。
どの場合も、以下の4つの項目が必要です:
識別子のタイプ | 識別子のタイプと識別子は、Yellowfinのユーザーを特定するのに使われます。識別子のタイプは、 |
|---|---|
識別子 | ユーザーを特定するための識別子を指定します。 |
フィルタータイプ | フィルタータイプは、それがどんなタイプのフィルターであるのかを示します。ユーザーがビューやレポートを作成するときに参照されます。できるだけ分かりやすい名称にしてください。 |
参照ID | 参照IDは、適合したユーザーがアクセスを許可されるデータを示します。 |
更新タイプ
| Styleclass | ||
|---|---|---|
| ||
Access Filters also have a Refresh Type option, which allows you to specify how the filter will be processed when changes are made. The default option is for updates to be appended to the existing entries. In this case, the new records entered will be added to those already saved. If you choose to overwrite the existing entries, any previous records will be discarded before saving the new records.
...
アクセスフィルターには更新タイプというオプションがあり、変更が行われたときにどのようにフィルターが処理されるかを指定することができます。デフォルトでは、既存のエントリに追加があった場合、新しいレコードが既存のものに追加されます。既存のエントリを上書きする設定を選択すると、新しいレコードが追加される前に既存のものすべてが破棄されます。
フィルタータイプの定義
| Styleclass | ||
|---|---|---|
| ||
Each source filter that you create needs to be categorised. You can share categories across various source systems but filters must have unique filter types within a source record.
The filter type is used to link the data in your source system with Yellowfin meta-data. It also provides a mechanism to categorise the type of filters that you can make available for your views.
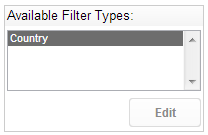
- From the Source entry page you will see the Available filter types on the right hand side of the page. Click Edit to add new filter types.
- From the popup click the add link to add a new filter type. This will open a section at the bottom of the popup. Enter a code and description of the filter type you are creating.
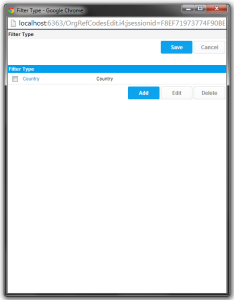
- Once you have created a new type click the add link and then the OK link to save all your changes. This will take you back to the main access filter page and you should see a filter type specified in the available list.
Note: If you wish to delete a filter type then from the edit popup select a type and click the delete link. You will be prompted to click OK to save your changes. If you delete a type which is in use this may impact your reporting filter process.
...
ソースフィルターは、必ずなんらかの種類に属している必要があります。この種類はいくつものソースシステムで共有することができますが、ソースシステム内でユニークでなければなりません。
フィルタータイプは、ソースシステム内のデータとYellowfinのメタデータを結び付けるためのものです。また、ビューの作成に利用できるようフィルターを分類するために使われます。
- データ入力のページに進むと、「使用可能なフィルターのタイプ」がページの右側に表示されています。新しいタイプを追加するために「編集」をクリックします。
- 開いた「カテゴリーの表示」ウインドウの「追加」をクリックします。ウインドウに入力セクションが追加されます。追加したいフィルターのタイプのコードと名前を入力してください。
- 新しいタイプを登録するために、入力した項目の下にある「追加」を、続いて「OK」をクリックしてください。ウインドウが閉じられ、「使用可能なフィルターのタイプ」に作成したタイプが表示されているはずです。
注意: フィルターのタイプを削除するには、「カテゴリーの表示」ウインドウで削除したい種類のチェックボックスをオンにし、「削除」をクリックします。確認メッセージが表示されますから、「OK」をクリックしてください。使用中のフィルターのタイプを削除すると、レポート実行におけるフィルタープロセスに影響が及ぶ可能性があります。
手動データ登録
| Styleclass | ||
|---|---|---|
| ||
手動データ登録を選んだ場合、以下の図のようにデータの入力フィールドが表示されます。初期状態では入力できるデータは3件ですが、「追加」をクリックして必要なだけ追加することができます。フィルターが保存されるとき、空のデータは捨てられます。When you create an Access Filter manually, you will be presented with a list of records to fill in. Initially the page displays three records, but you can add more records by clicking the "More" link underneath. When you save the filter, empty records will be discarded.
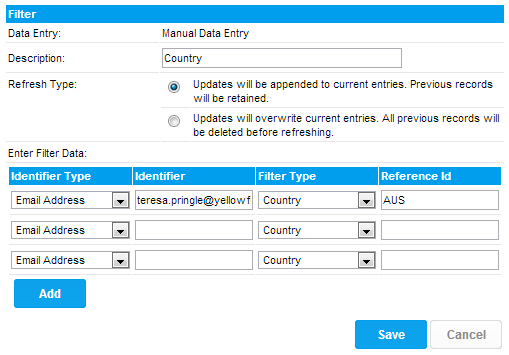
Note: If records exist you can view these by clicking the view record link located at the bottom of the entry section.
...
注意: このフィルターに対して既にデータが存在する場合、「ビューレコード」をクリックすればそれらを参照することができます。
データファイルのアップロード
| Styleclass | ||
|---|---|---|
| ||
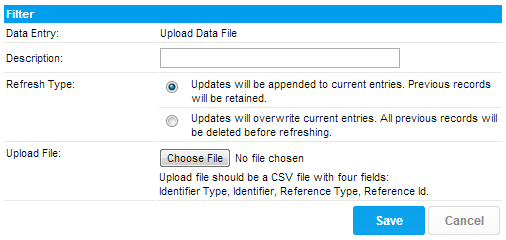
When you choose to create an Access Filter by uploading a data file, the screen will show a file selection box. Click on the Browse button to open the CSV file containing the filter records. The file must consist of records of the four fields listed above. The file may contain a header row, which must have the titles "Identifier Type", "Identifier", "Reference Type" and "Reference Id".
...
データファイルのアップロードを選択した場合には、画面にファイル選択ボックスが表示されます。「参照」ボタンをクリックしてデータを収めたCSVファイルを指定してください。各データには前述の4項目が必要です。ヘッダー行を含む場合、それぞれの項目名を「識別子のタイプ」、「識別子」、「参照タイプ」、「参照ID」としてください。
計画されたSQLクエリー
| Styleclass | ||
|---|---|---|
| ||
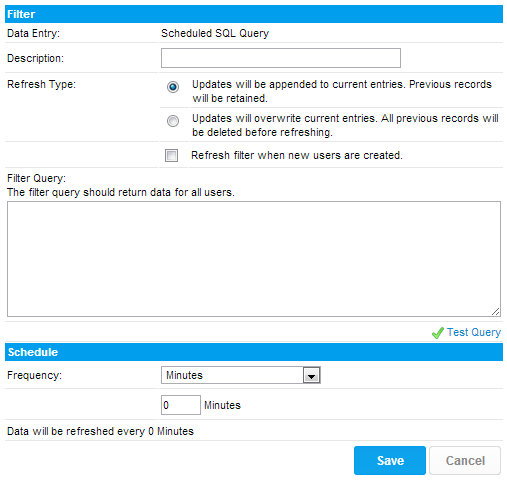
When you create an Access Filter using the scheduled query option, you will need to enter a SQL query and schedule it for refresh.
The query will run against the source database, and must return four fields corresponding to the fields described above.
Click on the Test Query link to run the query and report any errors. This will test the SQL syntax, but will not validate the data returned.
...
データ入力方法に「計画されたSQLクエリー」を選択した場合、SQLクエリーを作成し、その更新スケジュールを設定する必要があります。
クエリーはソースデータベースに送信され、前述の4つの項目のデータを返すよう書かれていなければなりません。
クエリーを作成したら「テストクエリー」をクリックして構文チェックを行います。ただしこのテストは、返されるデータの内容については関知しません。
ビューへのアクセスフィルターの適用
| Styleclass | ||
|---|---|---|
| ||
Once you have set up one or more Access Filters on a data source, you can assign them to any views created against that source.
- Create your view as normal, and then on the Fields page, select a field that corresponds to one of the Reference Types you have created.
- On the Access tab, select the correct type from the Access Filter selection. You will not be able to select Reference Types that don't have any filter records saved against them.
- Once you have selected the Access Filter, save the field. You can select more than one field to be different Access Filter types if you wish.

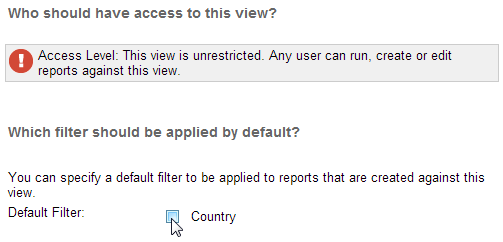
- Once you have finished assigning access filter types to the fields on the view, go to the View Security page. You can select a default filter to be applied to reports created against this view here, or choose not to have one. If you select a default filter, any subsequent report created against this view will have the filter applied. Users creating reports that have the appropriate access level can change or remove the filter on a per-report basis.
...
データベース上に作成したアクセスフィルターは、そのソースに対して作成されるどんなビューに対しても適用することが可能です。
- ビューを作成したら、「ビューフィールド」画面で、フィルターに設定した「参照タイプ」のどれかと一致するフィールドを選びます。
- 「アクセス」タブを開き「アクセスフィルター」というドロップダウンメニューからそのタイプを選んでください。このとき、定義だけでデータが入力されていないタイプを選択することはできません。
- フィルターのタイプを選んだら、このフィールドの設定を保存します。複数のフィールドに対して異なるフィルターを適用することができます。
- ビュー上のフィールドにアクセスフィルターのタイプを設定したら、「ビューセキュリティ」画面に移動します。ここではこのビューに対して作成されるレポートにデフォルトで適用されるフィルターを選ぶことができます。デフォルトとして設定されたフィルターは、以降このビューに対して作成されるすべてのレポートに適用され、アクセス権を持つレポート作成者だけが、このフィルターの設定を変更したり解除したりすることができます。
レポートへのアクセスフィルターの適用
| Styleclass | ||
|---|---|---|
| ||
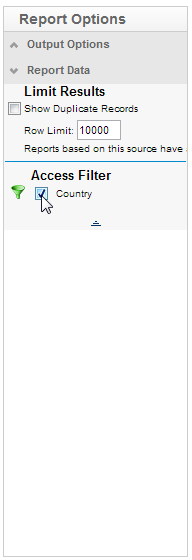
When creating a report using the Drag and Drop Builder, an Access Filter can be applied if the selected View has had Access Filters defined.
On the Report Data page, open the Report Data section in the Report Options box on the right hand side. The Access Filter selection box contains any filters that have been attached to the selected view.
If you select a filter, it will be applied to the results for each user when they run the report.
ドラッグ&ドロップで作成機能を使用してレポートを作成する際、ビューに対して定義されているアクセスフィルターを適用することができます。
「レポートデータ」画面の右側にある「レポートのオプション」欄から「レポートデータ」を開きます。「アクセスフィルター」欄に、このビューに設定されたすべてのフィルターが表示されます。
ここでフィルターを選択すれば、誰が実行するどんなレポートの結果にもそのフィルターが適用されます。
注意: ビューに対してアクセス権を持つユーザーだけが、レポートに対するフィルターの設定を変更できます。Note: that only users with the appropriate security access level will be able to change the Access Filter on a report.
| horizontalrule |
|---|
| Styleclass | ||
|---|---|---|
| ||