Page History
...
| Table of Contents | ||
|---|---|---|
|
...
概要
| Styleclass | ||
|---|---|---|
| ||
The formula builder assists you to write valid formulas for your view. Calculated fields written in this way can be used as normal fields within a report - i.e. all functions can be applied to them such as aggregations etc. This is not possible with SQL calculated fields. To begin you will need to work out what type of field your resulting value will require and select either Metric or Dimension.
Metric
This calculation returns numeric values and allows for standard Metric formatting options such as decimal places, prefix, suffix, and default aggregation.
Dimension
This calculation allows for all the standard Dimension formatting and functionality such as inclusion in Drill Down Hierarchies.
Creating a Calculation
- Drag in the appropriate Formula Builder field type (Metric or Dimension), assigning it to a Field Category.
- Navigate to the Formula tab
- The formula builder will allow you to generate a valid formula that will be returned by this column. Highlighted buttons will help guide you to create a valid formula.

- Test your formula by clicking the test formula link.
- Save & Activate
...
式ビルダーは、フィールドに設定される関数の定義を支援します。作成された計算フィールドは、レポート上で通常のフィールドと同じように使用可能です。定義された関数は集計を含むすべてのフィールドに適用可能ですが、SQLを使用した計算フィールドに対してだけは適用できません。はじめに、結果として得る値に必要なフィールドのタイプを判断し、メトリック(数値)またはディメンション(次元)を選択する必要があります。
メトリック(数値)
この計算は、数値を返します。また、小数点以下桁数、接頭文字、接尾文字、およびデフォルト集計など、標準的なメトリック書式設定オプションを使用できます。
ディメンション(次元)
この計算方法では、ドリルダウン階層への組み込みなど、すべての標準的なディメンション書式設定および機能を使用できます。
計算の作成
- 適切な式ビルダーフィールドタイプ(メトリックまたはディメンション)にドラッグして、フィールドカテゴリーに割り当てます。
- 「式」タブに移動します。
- 式ビルダーを使って、このカラムが返す関数を作成することができます。作成にあたっては、以下の図のようにハイライトされたボタンが使用できます。
- 「ここをクリックし、この式をテスト」をクリックして、関数をチェックすることができます。
- 保存して有効化します。
Case文
| Styleclass | ||
|---|---|---|
| ||
More complex calculations can be created using the case statement. The case statement allows you to create new values in columns based on business logic. For example IF age is less than 20 then print "Young".
Case Statement Structure
Case文を使えば、より複雑な関数を作ることができます。Case文を使用して、ビジネスロジックに基づく新しい値をカラム内に作成できます。たとえば、年齢が20歳未満の場合に、「Young」と表示することができます。
Case文の構造
Case文について精通していない場合、以下の基本構造を参考にしてください:If you are not familiar with Case Statements, the basic structure is as follows:
| Code Block | ||
|---|---|---|
| ||
CASE WHEN this isこれが真の場合 true THEN return thisこれを返す WHEN thisこれが真の場合 is true THEN return thisこれを返す WHEN this is trueこれが真の場合 THEN return thisこれを返す ... ELSE return thisこれを返す END |
Each of the items in CAPS are a component in the case statement:
大文字の項目は、すべてCase文の要素です:
要素 | 説明 | ||
|---|---|---|---|
CASE | 計算は、必ずCASE要素で開始されます。式を作成する前に、この要素を追加していることを確認してください。この要素を追加しないと、その他の要素を使用できません。 | ||
WHEN | Case文では、必要な数だけWHEN要素を使用できますが、これらは必ずELSE要素の前に配置する必要があります。WHENは、条件の定義に使用します。たとえば以下のように指定します: | ||
Component | Description | ||
CASE | The calculation will always begin with the CASE component. Make sure you have added this before trying to build the formula, other components will not be available until you do. | ||
WHEN | You can have as many WHEN components as you like in a Case statement, but they will always need to be before the ELSE component. WHEN is used to define a condition, for example: | ||
THEN | WHEN要素と連動し、条件が満たされた場合にYellowfinが返す値を指示します。例: | THEN | This is linked to the WHEN component and instructs Yellowfin on what to return when the condition is met. For example: |
ELSE | This is an optional component that is used to tell Yellowfin what to do when none of the WHEN conditions are met. It basically works like an extra THEN component. | ||
END | The calculation will always end with an END component in order to tell Yellowfin that it's complete. Your calculation will not be valid if you don't have an END so be sure to add it. |
Creating a Case Statement
- To insert a Case statement, click the CASE button in the Formula Builder.
- Click on the WHEN button will open a popup and create your first WHEN condition and THEN instruction.
Note: it operates similar to the formula builder, only allowing formula objects to be inserted where they are valid.

- Click OK to complete your condition/instruction
- Continue adding WHEN conditions until you have covered all the possibilities required
- Add an ELSE condition if needed, this is optional, but recommended.
- Add your END component
- Save & Activate your calculation
...
これは、AthleteAgeフィールドの値が21未満の場合、計算にはテキスト「Young」が返されることを意味しています。 | |
ELSE | いかなるWHEN条件も満たされない場合の動作をYellowfinに指示するためのオプションの要素です。この要素は、追加的なTHEN要素として機能します。 |
END | 計算は、必ずEND要素で終了します。これにより、Yellowfinに計算が完了したことを通知します。ENDが存在しない場合、計算は無効となります。必ずこの要素を追加してください。 |
Case文の作成
- Case文を挿入するには、式ビルダーで「Case」ボタンをクリックします。
- 「When」ボタンをクリックしてウインドウを開き、最初のWHEN条件とTHEN指示を作成します。
注意: 式ビルダーと同様に、クリック可能なボタンだけがハイライトされます。
- 「OK」をクリックして、条件および指示の作成を完了します。
- 考えられるすべての条件が網羅されるまで、WHEN条件の追加を続行します。
- 必要に応じてELSE条件を追加します。これはオプションですが、追加することを推奨します。
- END要素を追加します。
- 計算を保存して有効化します。
グループ化値
| Styleclass | ||
|---|---|---|
| ||
フィールドの値のグループ化を可能にします。例:This allows you to group the values of a field. For example:
| Section | |||||||||||||||||||||||||||||||||||
|---|---|---|---|---|---|---|---|---|---|---|---|---|---|---|---|---|---|---|---|---|---|---|---|---|---|---|---|---|---|---|---|---|---|---|---|
|
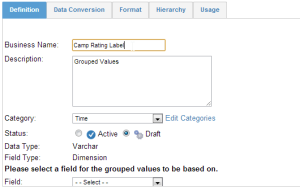
Creating a Grouped Values Field
In order to set up a Grouped Field complete the following (this example will create three groupings with text labels):
グループ化値フィールドの作成
グループ化フィールドを設定するには、以下のステップを実行します(この例ではテキストラベルを使用して3つのグループを作成します):
- 「グループ化値」フィールドを「使用可能フィールド」パネル内の任意のカテゴリーにドラッグします。
- グループ化の基準となるフィールドを選択します。

- 「表示名」を指定します。
- 「値」タブに移動します。
- 「グループの追加」をクリックします。
- 0から3の間を「不満」と指定します。
- 「保存」をクリックします。
- 0から3の間を「不満」と指定します。
- 「グループの追加」をクリックします。
- 4から7の間を「普通」に指定します。
- 「保存」をクリックします。
- 「グループの追加」をクリックします。
- フィールドを保存して有効化します。
- Drag in Grouped Values field into a Category in the Available Fields panel
- Select a Field to base the grouping on
- Supply a Business Name
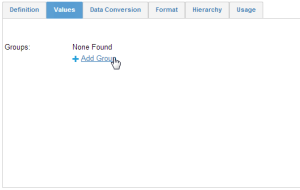
- Navigate to the Values tab
- Click on Add Group
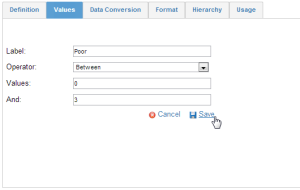
- Poor Between 0 AND 3
- Click Save
- Poor Between 0 AND 3
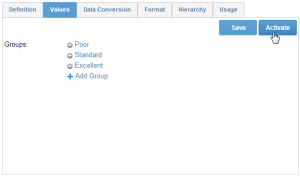
- Click on Add Group
- Standard Between 4 AND 7
- Click Save
- Click on Add Group
- Save & Activate your field
| horizontalrule |
|---|
| Styleclass | ||
|---|---|---|
| ||