Page History
...
| Table of Contents | ||
|---|---|---|
|
...
保存
| Styleclass | ||
|---|---|---|
| ||
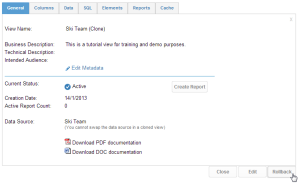
- From the view summary page click the save link
- Complete the form – most of the information may already have been completed.
- Update the status of the view from Draft to Active.
Note: Only ACTIVE views are available for reporting by end users. - Click Save to save the view as Active and return to the View Summary page.
...
- 「ビューサマリー」画面で「保存」をクリックしてください。
- 必要な項目を入力してください。既に入力されている項目もあるかもしれません。
- ステータスを「ドラフト(編集中)」から「有効」に変更してください。
注意:「有効」状態にあるビューだけが、レポート作成のために使用できます。 - ステータスが「有効」になっていることを確認して「保存」をクリックします。
編集
| Styleclass | ||
|---|---|---|
| ||
- To edit a view click the edit link from the view summary page. This link is only visible if the view is ACTIVE.
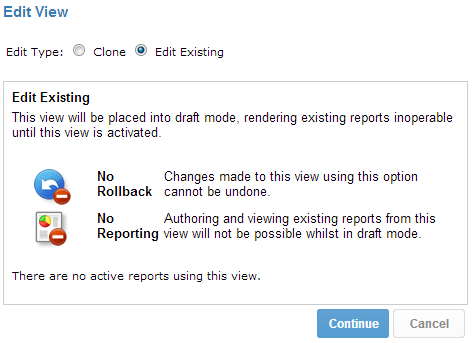
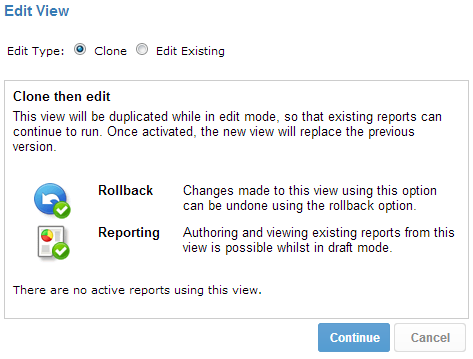
- Select if you wish to ‘clone’ or ‘edit the existing’ view.
If you edit the existing view then no users will be able to run reports against that view until you have activated it. Any changes you make to the view may impact existing reports and corruption may occur. You will also not be given the option to rollback the view to its previous state.
If you clone a view then the changes are made independently of report users. On activation the view will replace the previous version.
- Edit the view as required. Save and activate once changes have been completed.
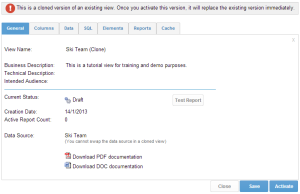
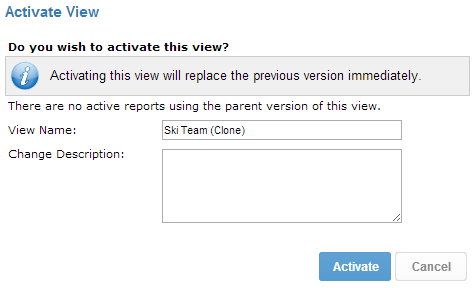
- When activating the view you will be prompted to update the view name and add a description of the changes made. This information will be available when rolling back the view.
...
- ビューを編集するには、「ビューサマリー」画面で「編集」をクリックします。このリンクはビューが「有効」状態にある場合だけ表示されます。
- 「複製」または「既存の編集」を選択します。
「既存の編集」を選択した場合、編集を終えてビューを「有効」状態に戻すまで、ユーザーはそのビューに対してレポートを有効にすることができません。既存のビューに対する変更はレポートに思わぬ影響を及ぼすかもしれません。また、ビューを前の状態にロールバックするオプションはありません。
「複製」を選択すれば、変更は既存のレポートに関係なく行えます。有効にすると、前のバージョンのビューが置き換えられます。
- ビューを編集します。変更が完了したら、保存して「有効」状態にしてください。
- ビューを有効にすると、ビュー名を更新し、変更の説明を追加できる画面が表示されます。この情報は、ビューをロールバックするときに表示されます。
ロールバック
| Styleclass | ||
|---|---|---|
| ||
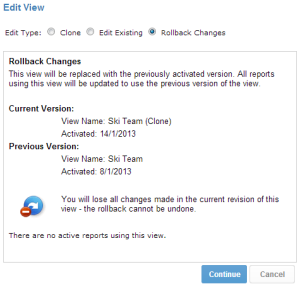
- Click on the Rollback link found on the View Summary page. This will only be enabled if a clone has been saved.
- You will now notice there is an extra option on the Edit View page allowing you to view the change description of the current view version and Rollback those changes.
...
- 「ビューサマリー」ページの「ロールバック」リンクをクリックします。このリンクは複製の保存後にのみ有効になります。
- 「ビューの編集」ページに追加のオプションが表示されます。このオプションを使用すると、現在のビューバージョンの変更内容を表示して、その変更をロールバックできます。
削除
| Styleclass | ||
|---|---|---|
| ||
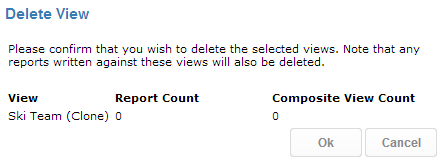
- To delete a view select the view from the views list by ticking the checkbox. Click the Delete link.
- You will have to confirm your deletion. The confirm page will show you how many active reports are currently attached to the view. If you delete the view all these active reports will be deleted as well.
- Click delete to confirm deletion
...
- ビューを削除するには、ビュー一覧から削除したいビューのチェックボックスをオンにして「Ok」をクリックしてください。
- 削除を確定する必要があります。そのビューを使用しているレポートの数と共に、削除を確認するメッセージが表示されます。このビューを削除した場合これらのレポートも同様に削除されます。
- 再度「Ok」をクリックして削除します。
コピー
| Styleclass | ||
|---|---|---|
| ||
...
キャッシュ
| Styleclass | ||
|---|---|---|
| ||
- 「ビューサマリー」ページの「キャッシュ」タブで、「このビューのキャッシュコピーを作成」をクリックします。
- 一連のオプションを設定する必要があります。設定したデータストアの名前を選択します。
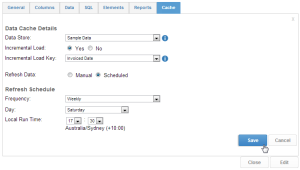
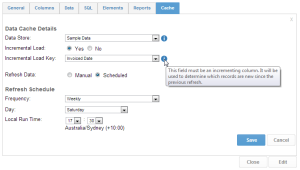
- キャッシュを増分でロードするかどうかを決定します。増分でロードする場合、ビューから増分ロードキーを選択するよう求められます。このフィールドは増加し続けるカラムでなければなりません。前回の更新から新しく追加されたレコードを見つけるために使用されます。
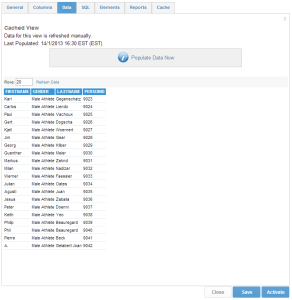
- 更新スケジュールを設定したら「保存」をクリックします。ビューはデータを定期的にキャッシュに入れるように設定されますが、スケジュールされた日付になるまで最初のデータセットは投入されません。データを手動で投入する場合は、「今すぐデータを投入」をクリックします。

- これでデータが投入されます。レコード数とビューロジックの複雑さによっては、数分かかることがあります。
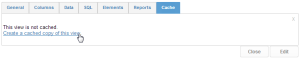
「データ」タブをクリックすると、データのスナップショットを表示できます。 - On the Cache tab of the view summary page, click on the Create a cached copy of this view link.
- You will now have a series of options to configure. Select the name of the data store you have setup.
- Decide if you wish the caching to be incrementally loaded. If Yes, you will be prompted to select an incremental load key from the view. This field must be an incrementing column as it will be used to determine which records are new since the previous refresh.
- Once you have set the refresh schedule, click Save. The view is now set to regularly cache its data, but will wait for the scheduled date to populate the first set of data. If you wish to populate the data manually click the Populate Data Now link.
- Yellowfin will now populate the data. Depending on the number of records and the complexity of the view logic, this task may take several minutes.
You can now click on the data tab to view a snapshot of the data.
| horizontalrule |
|---|
| Styleclass | ||
|---|---|---|
| ||