30日間の無料評価版をお試しいただけます。

Versions Compared

Key

  • This line was added.
  • This line was removed.
  • Formatting was changed.

...

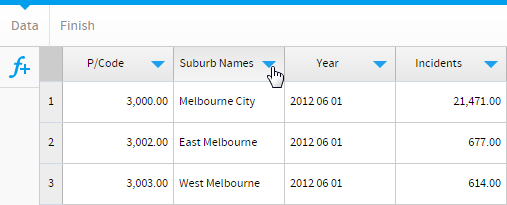
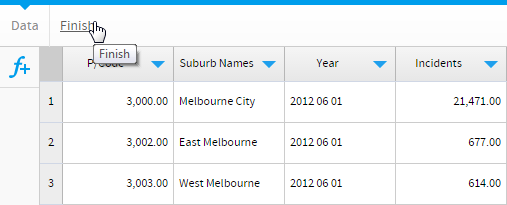
The following steps will walk you through linking data in your CSV to a loaded GeoPack:

Section
Column
width40%

1. During the CSV Import process in the Report Builder, while on the Data step, click on the drop down arrow on the Column Title you want to link to your pack.

Column
width60%

Image Added

Section
Column
width40%

2. Select the Field Type option from the menu, and change to Geography

You will now see the GeoPack screen. Here you will need to define how your pack relates to your data.

Column
width60%

!12geoType.png

Section
Column
width40%

3. Select the GeoPack you wish to link on. If you haven't imported the pack into the system yet, you can select the Not here? option and upload through the current screen.

Column
width60%

Image Added

Section
Column
width40%

4. Once selected, you will be shown information including the contents and origins of the pack. From here, you will need to select the level of geography you wish to link your field to. Some packs may have one level, some may have several, be sure to select the geography that exactly matches the data in your field.

5. Once selected, you will be shown a preview table with the selected geography, compared to the contents of your field. If the pack contains multiple aliases for the selected geography, you may have to select the appropriate alias format to match your data.

For example, if using Country field, your data may be stored as an ISO Code, in which case, you will need to make sure you select that format from the pack, rather than Country Name.

Note: when selecting the format, don't worry if the data in the two columns of the preview table do not match exactly, as long as the format is the same. For example, if using an Australian Postcode field, ensure both columns have 4 digits.

Column
width60%

Image Added

Section
Column
width40%

If you have selected a level that isn't the top of the hierarchy, you may be prompted to specify the Link Type. There are three options available here:

  • None: select this if the geography level in the pack contains unique pairings to that of your data.
  • Hierarchy: select this if the geography level in the pack requires other levels to be defined in order to create a unique link AND you do not have fields in your view that match up to the other levels of the pack hiearchy. This effectively means that you will need to select which pieces of data in your pack the field data belongs to, and the rest of the pack will be ignored.
  • Field: select this if the geography level in the pack requires other levels to be defined in order to create a unique link. For example, you may have two cities in a pack with the same name, so in order to differentiate them you will also need to link on the country name. This will mean you also need to link up the parent level with a matching field in your view.

6. Click Save to complete the link.

Column
width60%

Image Added

Section
Column
width40%

7. You will now notice that the field icon is a pin, rather than a dimension or metric icon.

Column
width60%

Image Added

Section
Column
width40%

10. Finsih your CSV import.

Column
width60%

Image Added

Section
Column
width40%

You are now able to use your linked pack data through the report builder. When adding fields on the Data step of the builder, your linked field will now be a folder containing all of the pack data, which can be added to your report the same way other fields can.

Column
width60%

Image Added

Standalone Map Layer

Styleclass
ClasstopLink

top

...