Page History
...
| Table of Contents | ||
|---|---|---|
|
...
概要
| Styleclass | ||
|---|---|---|
| ||
Once you've imported a CSV at the view level, you have two options to manipulate the data:
- Append - allows you to add new rows as long as the new data is contained in a CSV of the same format and columns as the original.
- Overwrite - allows you to replace the current data with new rows as long as the new data is contained in a CSV of the same format and columns as the original.
Note: if you import a CSV using the View Builder you are not permitted to delete the table. This is because this method was designed for repeat use, across multiple Views and Reports.
...
ビューレベルでのCSVのインポートが完了したら、データを操作するための以下の2つのオプションが提供されます:
- 追加 - 追加先のCSVと同じ書式とカラムを持つCSVに新規データが含まれている場合、新規ロウを追加できます。
- 上書き - 追加先のCSVと同じ書式とカラムを持つCSVに新規データが含まれている場合、現在のデータを新規ロウで置き換えることができます。
注意: ビュービルダーを使用してCSVをインポートした場合、テーブルの削除は許可されません。このインポート方法は、複数のビューおよびレポートで繰り返し使用するように意図されているためです。
ビュービルダーによる編集
| Styleclass | ||
|---|---|---|
| ||
In order to edit the contents of a CSV Table that was imported through the view, you will need to follow these steps;
ビューにインポートされたCSVテーブルの内容を編集するには、以下の手順を実行する必要があります。
- 「管理」>「ソースシステム&ビュー」の順に移動します。
- インポートされたデータを含むビューを選択し、「編集」ボタンをクリックします。

注意: テーブルが最初に作成された同じビューを編集する必要はありません。同じデータソースに基づくすべてのビューに編集が反映されます。ビュービルダーを使用してCSVがインポートされたら、同じ接続に基づくすべてのドラッグ&ドロップビューで利用可能になります。 - ビュービルダーのステップ1が表示されたら、データベーステーブル一覧で編集対象のCSVテーブルを特定します。
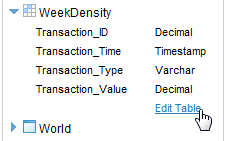
- テーブル名の横の矢印をクリックしてテーブルを展開し、「テーブルの編集」をクリックします。
- ここで、2つの編集オプションが提示されます。
- 追加: データを既存のテーブルの末尾に追加します。新しいデータのカラム数とカラム型は、元のファイルと同じである必要があります。

- 上書き: 既存のデータを置換します。新しいデータのカラム数とカラム型は、編集先ファイルと同じである必要があります。

- 追加: データを既存のテーブルの末尾に追加します。新しいデータのカラム数とカラム型は、元のファイルと同じである必要があります。
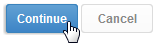
- オプションを選択したら、「ファイルの選択」ボタンをクリックしてCSVを特定し、「続行」をクリックしてアップロードします。

- 「CSVの更新」ページに自動的に移動し、更新するデータのプレビューが表示されます。「続行」をクリックしてデータをアップロードするか、「キャンセル」をクリックしてビュービルダーのステップ1に戻ります。
- Navigate to Administation > Source Systems & Views
- Select a View that contains the imported data, and click on the Edit button
Note: You do not have to edit the same view that the table was originally create is; any view cased on the same data source will work. Once a CSV is imported through the View Builder it becomes available to all the Drag & Drop Views based on the same Connection - Once you are on Step 1 of the View Builder, locate the CSV Table you wish to edit, through the Database Tables list
- Click on the arrow next to the table name to expand it, and click on the Edit Table link
- From here you will be presented with two edit options
- Append: this will add data to the end of the existing table. The new data must have the same number of columns and same column types as the original file.
- Overwrite: this will replace the existing data. The new data must have the same number of columns and the same column types as the original file.
- Append: this will add data to the end of the existing table. The new data must have the same number of columns and same column types as the original file.
- Once you've selected your option, click on the Choose File button, locate the CSV, and click Continue top upload
- You will then be taken to the CSV Update page to preview the data you will be updating with. Click Continue to upload the data or Cancel to return to Step 1 of the View Builder
| horizontalrule |
|---|
| Styleclass | ||
|---|---|---|
| ||