Page History
...
| Table of Contents | ||
|---|---|---|
|
...
前提条件
| Styleclass | ||
|---|---|---|
| ||
Java JRE
The server hosting the Yellowfin application MUST have Java 1.5 or higher installed on it. The Java JRE is sufficient for this purpose. Refer to the Sun web site for download and installation instructions (Yellowfiアプリケーションをホストするサーバーには、1.5以降がインストールされている必要があります。Java JREは、この条件を満たします。ダウンロードおよびインストール方法の詳細は、SunのWebサイト(http://www.java.sun.com))を参照してください。
Database
The database software which will contain the Yellowfin database should already be installed. Suitable jdbc drivers to enable the database to communicate with the Yellowfin application should also be installed. It is not necessary for the database server to reside on the same machine as the Yellowfin application.
...
データベース
Yellowfinデータベースを格納するデータベースソフトウェアがあらかじめインストールされている必要があります。データベースとYellowfinアプリケーション間の通信を可能にする適切なJDBCドライバーもインストールされている必要があります。データベースサーバーは、Yellowfinアプリケーションと同じマシン上に存在する必要はありません。
インストール手順
| Styleclass | ||
|---|---|---|
| ||
...
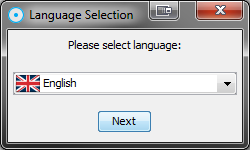
言語の選択
| Section | ||||||||||
|---|---|---|---|---|---|---|---|---|---|---|
|
...
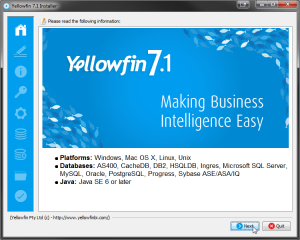
ウェルカム画面
| Section | ||||||||||
|---|---|---|---|---|---|---|---|---|---|---|
|
...
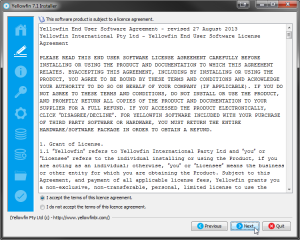
利用規約
| Section | ||||||||||
|---|---|---|---|---|---|---|---|---|---|---|
|
...
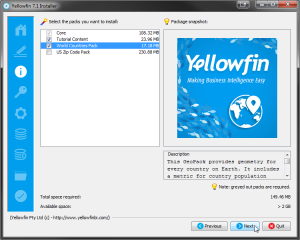
必要なコンポーネント
| Section | ||||||||||
|---|---|---|---|---|---|---|---|---|---|---|
|
...
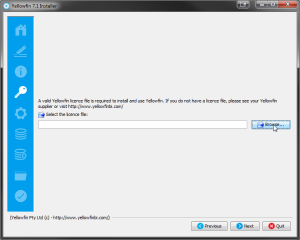
ライセンスファイル
| Section | ||||||||||
|---|---|---|---|---|---|---|---|---|---|---|
|
...
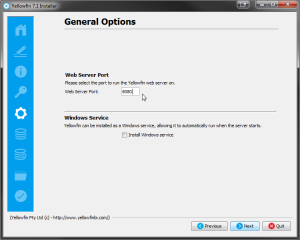
全般オプション
| Section | ||||||||||
|---|---|---|---|---|---|---|---|---|---|---|
|
...
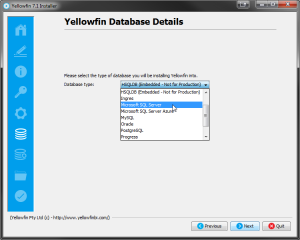
データベースの選択
| Section | ||||||||||
|---|---|---|---|---|---|---|---|---|---|---|
|
...
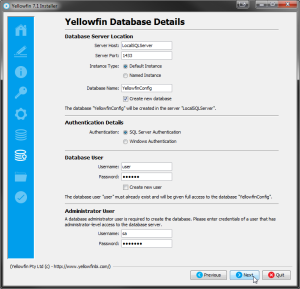
データベースの詳細(サンプル)
| Section | ||||||||||
|---|---|---|---|---|---|---|---|---|---|---|
|
...
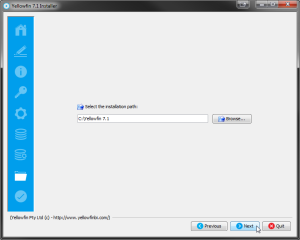
インストールパス
| Section | ||||||||||
|---|---|---|---|---|---|---|---|---|---|---|
|
...
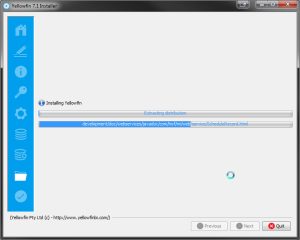
インストールの進捗
| Section | ||||||||||
|---|---|---|---|---|---|---|---|---|---|---|
|
...
ショートカット
| Section | ||||||||||
|---|---|---|---|---|---|---|---|---|---|---|
|

...
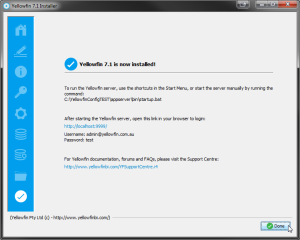
インストールの完了
| Section | ||||||||||
|---|---|---|---|---|---|---|---|---|---|---|
|
Troubleshooting
Most problems related to the Yellowfin application server installation relate to database connectivity and administration issues.
トラブルシューティング
Yellowfinアプリケーションサーバーに関する問題の多くは、データベース接続および管理の問題に関するものです。
以前にも述べたように、データベースインストールのログが保持されています。このログは、As mentioned previously, a log is kept of the database installation and can be found in $INSTALL_DIRECTORY\uninstall directory.
The most likely problem will be the incorrect setting or misspelling of the parameters entered in Step 7 Configure the Database Connection and User parameters eg. database name, port, IP address etc.
Customers using Microsoft SQLServer or Microsoft MSDE should ensure that the IP addresses and configuration are consistent with the parameter values entered. The Microsoft program svrnetcn.exe (SQLServer Network Utility) can be used to check that the SQLServer IP stack (including the JDBC port number) has been configured correctly. It can be used for both SQLServer and MSDE.
...
ディレクトリに存在します。
最も多い問題は、ステップ7のデータベース接続とユーザーパラメーターの設定で入力したパラメーター、すなわちデータベース名、ポート、IPアドレスなどの誤設定または誤入力です。
Microsoft SQLServerまたはMicrosoft MSDEを使用しているお客様は、IPアドレスおよび設定が入力したパラメーター値と一貫性があることを確認してください。Microsoftのプログラムsvrnetcn.exe(SQLServerネットワークユーティリティ)を使用して、SQLServer IPスタック(JDBCポート番号を含む)が正しく設定されているかどうかを確認できます。このユーティリティは、SQL ServerとMSDEの両方に使用できます。
例
Network error IOException: Connection refused: connect()
This error means that the installer cannot connect to your MS SQL server instance. This error occurs before authentication takes place. This means that either:
- SQL Server is stopped on the server you are trying to connect to.
- The connection details you entered were incorrect.
- You have a network problem that stops the computer you're running the installer on connecting to the SQL server host (Unlikely if you are connecting to your localhost).
Verify these settings on the Configuration DB Parameters screen on the installer.
- Database Server Name - This will probably be the "localhost".
- Database Server Port - This should be 1433
- Database Name - This is the name of the database you want Yellowfin to install to. This should be "yellowfin". This is used for Yellowfin configuration and operational data. It is not the database you wish to report off.
- Create Database - Click this to create the new Yellowfin database. We suggest removing the Yellowfin database if your installation failed previously.
- DBA User: This could be "sa"
- DBA Password: This could be "sa"
- Reports UserId:Set this to "yellowfin_user"
- Reports UserId password: Set this to "yellowfin_user" or whatever you prefer.
- Create user id - Check this checkbox.
Additional Resources
このエラーは、インストーラーがMS SQL Serverインスタンスに接続できないことを意味しています。このエラーは、認証が行われる前に発生します。これは、次のいずれかの状態であることを意味しています。
- 接続を試みたサーバー上でSQL Serverが停止した。
- 入力した接続の詳細が正しくない。
- ネットワークに問題があり、インストーラーを実行しているコンピューターがSQL Serverホストに接続するときに停止した(localhostに接続する場合は問題ない)。
インストーラーの構成データベースパラメーターの画面で、以下の設定を確認してください。
- データベースサーバー名 - 多くの場合"localhost"です。
- データベースサーバーポート - 1433に設定します。
- データベース名 - Yellowfinのインストール先データベースの名前です。ここでは、"yellowfin"とします。これは、Yellowfinの構成および運用データに使用されます。レポートを作成する元のデータベースではありません。
- Yellowfinデータベースを作成 - これをクリックして新しいYellowfinデータベースを作成します。以前にインストールに失敗している場合は、このYellowfinデータベースを削除することをお勧めします。
- DBAユーザー名:ほとんどの場合"sa"です。
- DBAパスワード:ほとんどの場合"sa"です。
- Yellowfinユーザー名:"yellowfin_user"に設定します。
- Yellowfinパスワード:"yellowfin_user"または任意のパスワードに設定します。
- データベースユーザーを作成- このチェックボックスをオンにします。
補足資料
その他のインストールに関する問題が発生する場合、Yellowfinフォーラムで解決策を見つけることをお勧めします。If you are experiencing other installation issues the Yellowfin forum is a good place to look for answers. Go to http://www.yellowfinbi.com/YFForum.i4 to explore previous posts or seek help from other users and Support Members. Some useful troubleshooting posts include:にアクセスして、過去の投稿を参照するか、他のユーザーやサポートメンバーの支援を求めます。以下の投稿は、トラブルシューティングに役立ちます。
- http://www.yellowfinbi.com/YFForum-ERROR-Yellowfin-Installation-on-MS-Server-08-?thread=103838
- http://www.yellowfinbi.com/YFForum-install-Yelliowfin-on-SQL-Server-2005-?thread=89809
- http://www.yellowfinbi.com/YFForum-New-installation-of-Yellowfin-but-it-s-not-launching-?thread=105437
If the above posts do not solve the issues you're experiencing, please send an email to support@yellowfin.bi with a clear description of the issue, along with the following:
上記の投稿でも発生した問題を解決できない場合、問題を明確に記述した上で以下を添付した電子メールをsupport.jp@yellowfin.bi宛てに送信してください。
- スクリーンショット(該当する場合)
- YellowfinInstallLog-<日付>.log(Yellowfinディレクトリ内にあります)
- Yellowfin\appserver\LOGS内のすべてのログファイル(存在する場合)
- Screenshots (if applicable)
- YellowfinInstallLog-date.log (this can be found in the Yellowfin directory)
- All log files found in Yellowfin\appserver\LOGS (if you have any)
| horizontalrule |
|---|
| Styleclass | ||
|---|---|---|
| ||