Page History
| Anchor | ||||
|---|---|---|---|---|
|
| Table of Contents | ||
|---|---|---|
|
...
概要
| Styleclass | ||
|---|---|---|
|
...
Yellowfin's CSV functionality allows business users to transform their existing spreadsheets into reports. This means that any of Yellowfin's reporting capabilities can be quickly applied to spreadsheet contents, including the ability to drill down and categorise data.
Yellowfin allows spreadsheet data (stored as CSVs) to be imported into a specified data source and used for reporting. There are two methods for importing CSV data to use for report building;
- Import a new CSV file through the Report Builder process
- Import a new CSV file through the View Builder process
Import Methods
Yellowfinでは、(CSVとして格納された)スプレッドシートデータを指定されたデータソースにインポートしてレポート作成に使用することができます。レポート作成に使用するCSVデータをインポートする方法は2つあります。
- レポートビルダーのプロセスを使用して新しいCSVファイルをインポートする
- ビュービルダーのプロセスを使用して新しいCSVファイルをインポートする
| Wiki Markup |
|---|
{html}<iframe width="700" height="394" src="//www.youtube.com/embed/NkBXxgTJ1Ps?color=white" frameborder="0" allowfullscreen></iframe>{html} |
インポート方法
| Styleclass | ||
|---|---|---|
|
...
When importing a CSV file for reporting use, it's important to consider what the data will be used for, and which import method would best suit that use.
Report Builder Import
If the CSV has been developed for stand-alone use, or the CSV data needs to be stored in a separate data source from other reporting data, and the desired reporting results can easily be achieved with advanced sub query functionality, then the Report Builder import method should be used.
When the Report Builder import process is used, the following happens:
- The user defines any calculations or converters to be applied to the data, creating additional fields in the final table.
- The user defines all default formatting and relationships between fields, such as drill down, through the CSV step. These will be reused whenever someone selects this CSV for report building.
- Yellowfin creates a View with all of the above fields, formatting, and relationships for reuse by other report writers. This View will be available during the report writing process, and the View itself can be edited by users with permission in order to adjust the default settings defined.
View Builder Import
If the CSV data is to be used in conjunction with tables from a reporting data source, the view import method should be used. This option also allows the import to be used across multiple views, rather than just multiple reports.
When the View Builder import process is used, the following happens:
- The user defines any converters to be applied to the data, creating additional fields in the final table.
- Yellowfin creates a table that is listed in the View Builder, allowing the user to select it, as they would any other table from the selected source connection. This table will be available to any View built on the writable source connection.
- The user selects the CSV table and adds it to the View like they would any other table, joining it to other tables, etc.
- The user defines any default formatting and relationships between fields, such as drill down, through the standard View Builder steps, rather than the CSV step.
レポートビルダーによるインポート
CSVがスタンドアロン用途に作成されている場合、またはCSVデータをその他のレポートデータとは別のデータソースに格納する必要がある場合、高度なサブクエリー機能を使用して目的のレポート結果を簡単に得られる場合は、レポートビルダーによるインポート方法を使用してください。
レポートビルダーによるインポートプロセスを使用する場合は、次のように操作します:
- データに適用する計算またはコンバーターを定義し、最終的にテーブルに追加するためのフィールドを作成します。
- デフォルトの書式とフィールド間の関連(ドリルダウンなど)をCSVのステップですべて定義します。これらの設定は、ほかのユーザーがこのCSVをレポート作成で選択したときでも常に再利用することができます。
- ほかのレポート作成者が再利用できるように、Yellowfinでは上記のフィールド、書式、および関連のすべてを設定したビューが作成されます。このビューはレポート作成プロセス中に使用でき、権限を持つユーザーであれば、定義済みのデフォルト設定を調整するためにビュー自体を編集できます。
ビュービルダーによるインポート
CSVデータをレポート作成のデータソースにあるテーブルと一緒に使用する場合は、ビュービルダーによるインポート方法を使用してください。このオプションでは、複数のレポート間だけでなく、複数のビュー間でインポートを使用できます。
ビュービルダーによるインポートプロセスを使用する場合は、次のように操作します:
- データに適用するコンバーターを定義し、最終的にテーブルに追加するためのフィールドを作成します。
- ビュービルダーに表示されるテーブルが作成されます。選択されたソース接続からほかのテーブルを選択する場合と同様に、この表も選択できます。このテーブルは、書き込み可能なソース接続上に作成されたすべてのビューで使用できます。
- ほかのテーブルの場合と同様に、CSVテーブルを選択してビューに追加し、ほかのテーブルに結合するといった操作を実行できます。
- デフォルトの書式とフィールド間の関連(ドリルダウンなど)は、CSVのステップではなく、標準のビュービルダーのステップで定義します。
設定
...
| Styleclass | ||
|---|---|---|
|
...
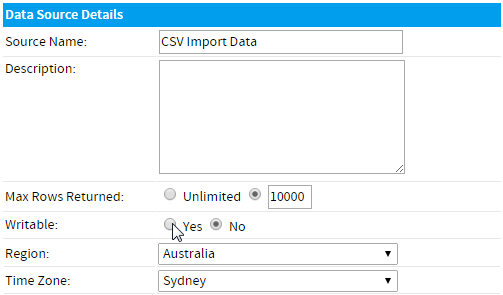
Writable Data Source
書き込み可能なデータソース
CSVファイルの内容をデータベースのテーブルに書き込むために、データソース接続を書き込み可能として定義する必要があります。書き込み可能な接続は、CSVのインポートやビューのキャッシュのためだけに作成される空のデータベースをポイントすることがあります。これは、インポートをメインのデータソースと分離したままにするためです。Yellowfin requires a Data Source connection to be defined as writable in order to write the contents of the CSV file to a table in the database. Often the writable connection will be pointing to an empty database, created solely for the purpose of importing CSVs or caching views. This is to ensure that any imports are kept separate from the main data sources.
| Expand | ||
|---|---|---|
| ||
In order to define a writable connection, complete the following:
|

Role Permissions
In order for a user to import CSVs in Yellowfin they must have the appropriate role permissions defined. As there are two methods of importing CSVs, there are also two sets of role permissions available.
| Section | ||||||||||||||||||||
|---|---|---|---|---|---|---|---|---|---|---|---|---|---|---|---|---|---|---|---|---|
|


Prepare CSV File
| Styleclass | ||
|---|---|---|
| ||
Before the import process can begin, you will need to obtain or create your CSV file. There are some guidelines in place to ensure a compatible file.
Do
- Column Based - ensure the data in your CSV is stored as columns, with no empty columns or rows at the start of the file (if examining through a spreadsheet tool).
- Date Format - the date format recognised by Yellowfin is
yyyy/MM/dd, so for example:2014/08/31. If possible, it's a good idea to ensure your dates are stored in this format. Yellowfin does have converters available as part of the import process, but ensuring your dates are in the correct format to start will avoid extra work during import. - No Totals - the CSV columns should not have any column or row totals applied, or other calculations and formats that may be lost during import, or mistaken for data values (rather than totals).
- Consistent Data per Column - ensure that the data contained in each column is the same type throughout the file. This will ensure that Yellowfin can correctly identify and assign the field type for each column. For example, if you have a date column, and all the data is dates, except a few records that have the text "N/A", remove the text and leave that empty. This will mean Yellowfin recognises the field as a date, rather than text.
- File Format - Yellowfin will only accept CSV files, no XLS, XLSX, or other formats will be accepted.
- Character Set - Ensure your file uses UTF-8 character set so that Yellowfin recognises all the characters contained in the file.
Don't
...
| |
書き込み可能な接続を定義するには、次の手順を実行します。
|
書き込み可能なHSQLデータソース
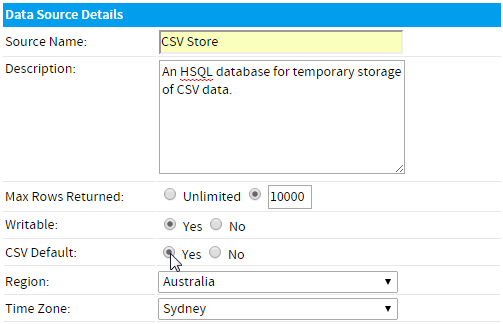
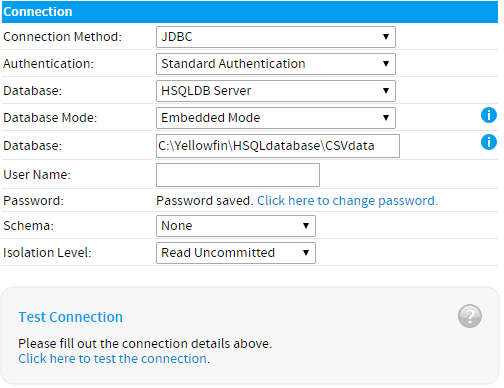
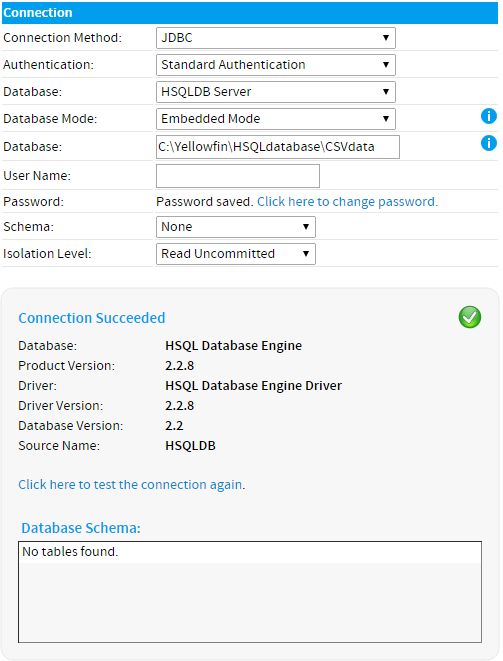
Yellowfinの開発インスタンス、QAインスタンス、または本番インスタンスの外部で操作することが多い場合は、一時的または試行的にCSVファイルのインポートが必要になることがあります。このような例としては、一時的な設定でCSVファイル形式を試行する場合や、概念実証(POC)のシナリオでサンプルのコンテンツを作成する場合が挙げられます。このような場合には、CSVデータを格納するために定常的なデータベースを設定不要であったり設定不可であったりします。一時的な解決方法としては、Yellowfinをインストール可能なものと同様な書き込み可能なHSQLデータベースを作成します。これを行うには、以下の手順を実行します。
注意:HSQLデータベースは不安定なので、長期間のソリューションで使用しないでください。
| Expand | ||
|---|---|---|
| ||
|
ロール権限
YellowfinでCSVをインポートするには、ユーザーに適切なロール権限が定義されている必要があります。CSVをインポートする方法は2つあるため、使用可能なロール権限も2つあります。
レポートビルダー
ユーザーには、レポートビルダーを使用してCSVファイルをインポートするための権限をすることが付与できます。これは2つある使用可能なインポート方法のうち簡単なものです。レポートビルダーを使用してCSVデータをインポートする必要がある場合は、次のロール権限が必要です。
| Expand | ||
|---|---|---|
| ||
|
ビュービルダー
ユーザーには、ビュービルダーを使用してCSVファイルをインポートするための権限を付与できます。一般に、このような権限は、ロールの一部として標準のYellowfinビューを既に保持するユーザーにのみ付与されています。また、これらのユーザーには、どちらの方法でも使用できるように、レポートビルダーによるインポートの権限も付与されていることもあります。ビュービルダーを使用してCSVデータをインポートする必要がある場合は、次のロール権限が必要です。
| Expand | ||
|---|---|---|
| ||
|
CSVファイルの準備
| Styleclass | ||
|---|---|---|
| ||
最適なファイル形式は?
- カラム(列)ベース - CSV内のデータがカラム(列)として格納されていることを確認します。ファイルの先頭に空のカラム(列)やロウ(行)は使用できません(スプレッドシートツールを使用して調べる場合)。
- 日付の書式 - Yellowfinで認識される日付の書式は
yyyy/MM/ddです(例:2014/08/31)。可能な場合は、日付をこの書式で格納することをお勧めします。Yellowfinでは、インポートプロセス中に使用可能なコンバーターが用意されていますが、開始時に日付が適切な書式になっていれば、インポート中の追加作業が不要になります。 - 合計欄を持たない - CSVのカラム(列)には、カラム(列)合計やロウ(行)合計が適用されないようにしてください。また、インポート中に失われる可能性のあるその他の計算や書式、データ値(合計ではなく)の誤りなどがないようにしてください。
- カラム(列)ごとに一貫性のあるデータ - 各カラム(列)に格納されているデータがファイル全体で同じデータ型であることを確認します。これにより、カラム(列)ごとにフィールドタイプが正しく識別され、割り当てできるようになります。たとえば、日付カラム(列)があり、数件のレコードにテキスト"N/A"が設定されている以外はすべてのデータが日付である場合は、このテキストが削除されて空欄のままになります。こうすることで、このフィールドはテキストではなく日付として認識されます。
- ファイル形式 - Yellowfinでは、CSVファイルのみを使用できます。XLS、XLSX、またはその他の形式は使用できません。
- 文字セット - ファイルに含まれるすべての文字が認識されるように、ファイルではUTF-8文字セットを使用してください。
互換性のないファイル形式
- クロス集計/ピボット - クロス集計/ピボット形式のデータをインポートしないでください。Yellowfinではファイルがカラム(列)形式であることを前提として検査するため、クロス集計/ピボット形式のデータの場合、意図しない使用不可能な構造で格納されてしまいます。
- 合計欄 - 合計欄をフィールドに加えないでください。Yellowfinでは、合計をほかのデータと区別しません。
- XLS形式 - データをXLSまたはXLSX形式で格納しないでください。Yellowfinで読み込めるのはCSVだけです。
...
| horizontalrule |
|---|
| Styleclass | ||
|---|---|---|
| ||
...