30日間の無料評価版をお試しいただけます。

Versions Compared

Key

  • This line was added.
  • This line was removed.
  • Formatting was changed.
Comment: Migration of unmigrated content due to installation of a new plugin

Anchor
top
top

Table of Contents
classcontents

...

概要

Styleclass
ClasstopLink

...

top

Before importing a CSV file you will need to ensure the functionality is enabled and your CSV file is ready.

See CSV Data Imports for more information.

Create

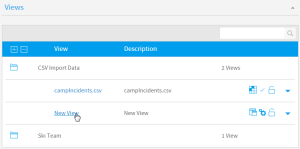
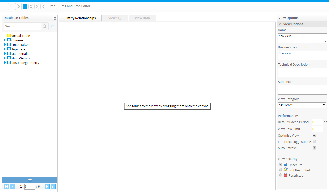
To import a CSV file through the View Builder you will first need to open the builder:

ページトップ

Wiki Markup
{html}<iframe width="700" height="394" src="https://www.youtube.com/embed/t6BbCslVsWE?color=white" frameborder="0" allowfullscreen></iframe>{html}
 

CSVのロード

Styleclass
ClasstopLink

ページトップ

CSVファイルをインポートする前に、機能が有効化されていてCSVファイルが用意されていることを確認してください。

詳細については、CSVデータのインポートを参照してください。

作成

ビュービルダーを使用してCSVファイルをインポートするには、まずビュービルダーを開く必要があります:

Expand
titleクリックして手順を表示します。
Expand
titleClick to Expand Instructions
Section
Column
width30%

1. Navigate to Administration > Admin Console, expand the Views section and click on the view you wish to import the CSV in.
Note: the selected view must be based on a writable data source.管理」>「管理コンソール」に移動し、「ビュー」セクションを展開して、CSVをインポートするビューをクリックします。
注意:選択したビューは、書き込み可能なデータソースから作成されている必要があります。

Column
width70%

Section
Column
width30%

2. Edit the view and access the first step of the View Builder.ビューを編集し、ビュービルダーの最初のステップにアクセスします。

Column
width70%

Section
Column
width30%

3. Click on the Add CSV Table button at the bottom of the Database Tables list on the left.左側の「データベーステーブル」一覧の下にある「CSVテーブルを追加」ボタンをクリックします。

Column
width70%

Load

ロード

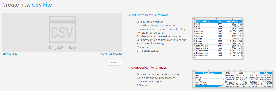
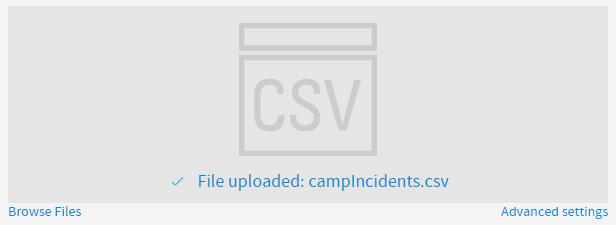
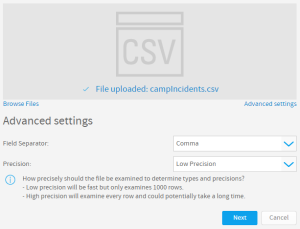
ここから、CSVファイルステップに移動し、CSVファイルを特定してロードする必要があります。From here you will be taken to the CSV File step where you will need to locate and load the CSV file.

Expand
titleClick to Expand Instructionsクリックして詳細を表示します。
Section
Column
width30%

1. Either click on the Browse Files link, or the CSV image to locate your file, or drag your file from the file system onto the grey area.ファイルを参照」リンクまたはCSVイメージをクリックしてファイルを指定するか、またはファイルをファイルシステムから灰色の領域にドラッグします。

Column
width70%

Section
Column
width30%

2. Once selected, Yellowfin will confirm that the file has been uploaded.選択すると、ファイルがアップロードされたことが確認できます。

Column
width70%

Section
Column
width30%

3. From here, if you have Advanced CSV Settings permissions, you can click on the Advanced Settings link, otherwise progress to step 4.
Advanced Settings include:ここで、高度なCSV設定の権限を持つ場合は、「高度な設定」リンクをクリックできます。それ以外の場合は、ステップ4に進みます。
「高度な設定」には、以下が含まれます:

  • フィールドの区切り - 値を区切るためにCSVで使用する文字がカンマでない場合に、文字を指定できます。「その他」を選択した場合は、独自の文字を入力できます。
  • 精度 - フィールドタイプおよびサイズを定義するために調べるCSVのロウ(行)数を定義できます。
    • 低精度」は高速ですが、ファイルの先頭1000行だけを調べます。
    • 高精度」はすべてのロウ(行)を調べるため、ファイルのサイズによっては時間がかかります。
  • Field Separator - this allows you to specify which character is used in the CSV to separate values in the case that it's not a comma. If Other is selected, you can type your own character.
  • Precision - this allows you to define how many rows of the CSV Yellowfin will examine in order to define the field types and size.
    • Low Precision is fast, and only examines the first 1000 rows of the file.
    • High Precision is slower, depending on the size of the file, as it examines all rows.
Column
width70%

Section
Column
width30%

4. Once complete, click the Next button to progress to the preview step.完了したら、「次へ」ボタンをクリックしてプレビューステップに進みます。

Column
width70%
 

...

データの設定

Styleclass
ClasstopLink

...

top

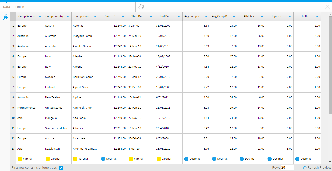
Once you've selected your file, and defined any settings required, you will be taken to the CSV Data step of the process. This is where you will be able to define several things, including Column Titles, CSV Table Settings, and Converted Fields.

Image Removed

Data Step Options

ページトップ

ファイルを選択し、必要な設定を定義したら、プロセスのCSVデータステップに進みます。ここでは、カラムタイトル、CSVテーブル設定、変換されるフィールドなどを定義できます。

Image Added

「データ」ステップのオプション

「データ」ステップのメニュー以外では、以下のオプションを使用できます。These options are available outside of the Data Step menus.

Expand
titleClick to Expand Details

Column Titles

By default, Yellowfin assumes that the first row of your CSV contains the text to be used as column titles, rather than data itself.
To change this option you can uncheck the First row contains unique titles option at the bottom-left of the page.
This will take the first row of the CSV and treat it as data, allowing you to provide your own labels.
Image Removed
If you wish to change some or all of the column titles displayed, you can click on the title, which will select it and allow you to enter new text
Image Removed

Rows

This allows you to change the number of rows previewed.
Image Removed

Refresh

This allows you to refresh the data displayed in the preview.
Image Removed

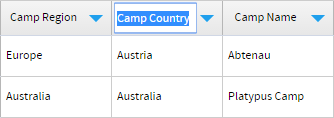
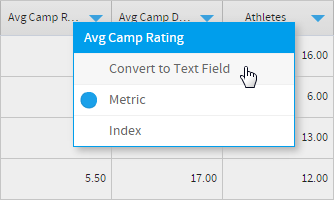
Field Drop Down Menu

This menu is accessed by clicking on the blue arrow on a Column Title.

クリックして手順を表示します。

カラムタイトル

デフォルトでは、CSVの最初のロウ(行)には、データそのものではなく、カラムタイトルとして使用するテキストが格納されているとみなされます。
このオプションを変更する場合は、ページの左下にある「最初の行をタイトルに含める」オプションをオフにできます。
これにより、CSVの最初のロウ(行)はデータとして扱われるようになり、独自のラベルを使用できるようになります。
Image Added
表示されるカラムタイトルを一部またはすべて変更する場合は、タイトルをクリックして選択し、新しいテキストを入力できます。
Image Added

ロウ

プレビューするロウ(行)の数を変更できます。
Image Added

更新

プレビューに表示するデータを更新できます。
Image Added

フィールドドロップダウンメニュー

このメニューにアクセスするには、カラムタイトルの青色の矢印をクリックします。

Expand
titleクリックして詳細を表示します。
Expand
titleClick to Expand Details
Section
Column
width3%

!.png!Image Added

Column
width97%

Convert to Text Field

This allows the contents of the field to be treated as text, changing the functionality that's available to it from numeric or date to text. This option is only displayed on fields not recognised as text natively.

Field Type

This tells you if Yellowfin recognises the field as a Metric or Dimension. This can be changed through formatting the field in the View Fields step of the builder.

Index

This allows you to add an index to the field in order to increase read performance. Generally, indexes should be added to fields that will be used in joins or filters.

Settings

フィールドをテキストに変換

フィールドの内容をテキストとして扱えるようにして、そのフィールドで利用できる機能を数値または日付からテキストに変更します。このオプションは、ネイティブでテキストであると認識されないフィールドにのみ表示されます。

フィールドタイプ

フィールドがメトリック(数値)とディメンション(次元)のどちらとして認識されているのかが表示されます。ビルダーのビューフィールドステップでフィールドの書式設定から変更できます。

インデックス

読み取りのパフォーマンスを向上させるために、フィールドにインデックスを追加することができます。一般的に、インデックスは結合やフィルターで使用されるフィールドに追加してください。

設定

インポートプロセスの最後でCSVファイルから作成されるビューに関連するメタデータやその他のオプションを定義できます。This menu allows to define meta data and other options relating to the View that Yellowfin will create from the CSV file at the end of the import process.

Expand
titleClick to Expand Details

Name

This will be the name of the CSV View that Yellowfin will create at the end of the import process. This is how report writers will identify it in the list of views on the Create Report step.

Description

This will be the description of the CSV View that Yellowfin will create at the end of the import process. This should contain information about what's contained in the CSV, which report writers will have access to in the list of views on the Create Report step.

Add Fields

クリックして詳細を表示する。

名前

インポートプロセスの最後で作成されるCSVテーブルの名前です。この名前は、ビュービルダーの最初のステップで、ビューの作成者がデータベーステーブルの一覧でCSVテーブルを識別するために使用されます。

説明

インポートプロセスの最後で作成されるCSVテーブルの説明です。CSVの内容に関する情報を含めるようにしてください。

フィールドの追加

CSVの既存のフィールドに対して有効なオプションを選択して、新しいフィールドを作成することができます。これらの機能では、既存のフィールドは変更されず、変換の結果を格納するために新しいフィールドが作成されます。This menu allows you to choose from one of the available options in order to create a new field, based on existing fields from the CSV. These functions will not change the existing fields, only create new ones to store the result of a conversion.

Expand
titleClick to Expand Details

Date Conversion

This allows you to convert a non-standard format date field (one Yellowfin doesn't recognise as a date by default) to a recognised date/time field, by specifying its format.
See Date Conversion for more information.

Timestamp Conversion

This allows you to convert values stored in Java time format (milliseconds since midnight January 1, 1970, GMT) to timestamps.

Numeric Conversion

This allows you to convert fields recognised as text by Yellowfin, that contain numeric values, to numeric fields.

...

クリックして詳細を表示する。

日付変換

標準の日付形式ではない日付フィールド(デフォルトで日付であると認識されないフィールド)に対して、フォーマットを指定することで日付/時間として認識可能なフィールドに変換できます。
詳細については、日付変換を参照してください。

タイムスタンプ変換

Java時間形式(1970年1月1日0:00(GMT)からの経過ミリ秒数)で格納された値をタイムスタンプに変換できます。

数値変換

テキストとして認識される数値が格納されたフィールドを数値フィールドに変換できます。

完了またはキャンセル

Styleclass
ClasstopLink

...

top

ページトップ

CSVデータの書式設定と設定が完了したら、次のいずれかを実行する必要があります。 

完了

完了」リンクをクリックすると、CSVインポートプロセスが完了し、バックグラウンドでCSVテーブルが作成され、ビュービルダーの「ドラッグ&ドロップ」ステップに戻ります。ここから他のテーブルと同様に、キャンバスにCSVテーブルをドラッグすることができます。

Image Added

キャンセル

画面右上隅にある「X」ボタンをクリックすると、インポートプロセスをキャンセルします。ファイルに基づくCSVテーブルは削除されます。インポートを続行しない場合に、このオプションを選択します。

Once the formatting and configuration of the CSV data is complete, you will need to do one of the following:

Finish

Clicking on the Finish link will complete the CSV import process, creating the CSV Table in the background, and will return you to the Drag & Drop step of the View Builder. From here you can drag your CSV table into the Entity Relationship Diagram, like any other table.

Image Removed

Cancel

Clicking on the X button in the top-right corner of the screen will cancel the import process. The CSV Table based on the file will be deleted. Select this option if you don't wish to go ahead with the import.

horizontalrule
Styleclass
ClasstopLink

ページトップ

...