Page History
...
| Table of Contents | ||
|---|---|---|
|
...
概要
| Styleclass | ||
|---|---|---|
| ||
Much like the Login Page, customisation of the standard Yellowfin Header & Footer can be performed two ways:
- Simple - this involves the replacement of images, and changes to the CSS files used by the header and/or footer, without having to write a panel. Generally this option is used for quick 'mock ups' but not the final restyled product.
- Complete - this involves writing a custom file to replace the header and/or footer panel. This method requires more technical knowledge, and more time.
Header
The Yellowfin header sits at the top of each page in the system:

Footer
The footer is located at the bottom of the page, and is centred on the Dashboard if the dashboard position is set to Centre:
ログインページと同様に、標準のYellowfinヘッダーおよびフッターのカスタマイズは次の2つの方法で実行できます。
- シンプル - イメージの置き換えおよびヘッダーおよびフッターに使用されているCSSファイルの変更を伴います。パネルを記述する必要はありません。一般的に、このオプションは簡易的なモックアップに使用され、スタイルが変更された最終版としては使用されません。
- 完全 - カスタムファイルを記述してヘッダーおよびフッターパネルを置き換える作業を伴います。この方法は高度な技術的知識および時間を必要とします。
ヘッダー
Yellowfinヘッダーはシステム内の各ページの上部に位置します。
フッター
フッターはページの下部に位置し、ダッシュボードの位置が中央揃えに設定されている場合はダッシュボードの中央で位置揃えされます。
例
...
| Styleclass | ||
|---|---|---|
| ||
Yellowfin\appserver\webapps\ROOT\customimages) with your customised versions:)で以下のイメージをカスタマイズしたバージョンと置き換えます:- header_logo.gif
- logoFooter.png
You will need to clear your browser cache once replacing these images in order for them to appear.
Note: the images you wish to use as replacements will need to have the same name as the files listed above in order for the page to pick them up. You no longer have to overwrite the originals, simply place your new images in the custom directory. This will mean that they will not be overwritten during the upgrade process.
Example
これらのイメージを置き換えたら、新しいイメージが表示されるようにブラウザーのキャッシュをクリアする必要があります。
注意:置き換えとして使用するイメージは、上記のファイルと同じ名前にしてページで使用されるようにする必要があります。オリジナルを上書きする必要はなく、単に新しいイメージをカスタムディレクトリに配置します。これにより、新しいイメージはアップグレードプロセス時に上書きされません。
例
コンポーネント | 標準 | カスタム |
|---|---|---|
ヘッダー全体 | ||
Component | Standard | Custom |
Full Header |
|
|
Full Footerフッター全体 |
|
|
header_logo.gif |
|
|
logoFooter.png |
|
|


...
完全
| Styleclass | ||
|---|---|---|
| ||
Instructions
The included HTML should he a fragment, suitable for including inline within another HTML page, rather than it being a full HTML document itself. That is, it should NOT contain <HTML>, <HEAD>, or <BODY> tags. Remember that any links inside the HTML will be relative to the Yellowfin page. It is recommended to use absolute HTML links.
作成方法
含まれるHTMLは、完全なHTMLドキュメント自身ではなく、別のHTMLページにインラインで含めるための構成要素である必要があります。つまり、<HTML>、<HEAD>、または<BODY>タグを含めることはできません。このHTML内のすべてのリンクは、すべてYellowfinページに対して相対的となります。絶対的なHTMLリンクを使用することをお勧めします。
標準のYellowfinヘッダーには、ユーザーがシステムからログアウトするための1つのリンクのみが提供されていることに留意することも重要です。置き換えたヘッダーでこのリンクを提供する場合は、次を含めます。It is also important to remember that the standard Yellowfin Header provides only one link for a user to log out of the system. If the header is being replaced and you wish to provide this link, include:
| Code Block | ||
|---|---|---|
| ||
javascript:on_submit('logoff');
|
There is also a sample header file available as a starting point in the Yellowfin Examples directory (Yellowfinのサンプルディレクトリ(Yellowfin\development\examples\CustomHeaderExample.jsp).)には、サンプルのヘッダーファイルが含まれており、これを使用してカスタムヘッダーの作成を開始できます。
- カスタムのヘッダーおよびフッターファイルをYellowfinのROOTディレクトリ(Save your custom Header & Footer files in the Yellowfin ROOT directory (
Yellowfin\appserver\webapps\ROOT)Save )に保存します。 - 必要なすべてのイメージをYellowfinのcustomimagesディレクトリ( any required images in the Yellowfin customimages directory (
Yellowfin\appserver\webapps\ROOT\customimages))に保存します。 - 使用するすべてのCSSファイルを更新するか、新しいCSSファイルをYellowfinのcustomcssディレクトリ(Update any CSS files used, or add new ones to the Yellowfin customcss directory (
Yellowfin\appserver\webapps\ROOT\customcss) - In Yellowfin, navigate to Administration > Configuration > Integration (tab)
Here you will need to specify the locations of your custom files, for example:
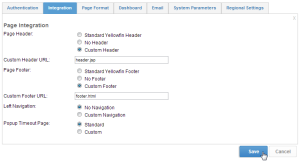
- Change the Page Header option from Standard Yellowfin Header to Custom Header and specify the URL of the file.
- Change the Page Footer option from Standard Yellowfin Footer to Custom Footer and specify the URL of the file.
- )に追加します。
- Yellowfinで、「管理」>「設定」>「インテグレーション」(タブ)に移動します。
ここで、カスタムファイルの場所を指定します。たとえば、次のように指定します。
- 「ページヘッダー」オプションを、「標準ヘッダー」から「カスタムヘッダー」に変更して、ヘッダーファイルのURLを指定します。
- 「ページフッター」オプションを、「標準フッター」から「カスタムフッター」に変更して、フッターファイルのURLを指定します。
カスタムURLは、毎回ページが読み込まれるときの実行時に含まれるHTML構成要素へのリンクです。この構成要素は、Yellowfinサービスがアクセス可能な任意のサーバーに配置できますが、最高のパフォーマンスを得るために、同一のサーバー上に配置することをお勧めします。この例では、構成要素ファイルをYellowfinのROOTディレクトリ(The Custom URL is a link to the html fragment that will be included at runtime every time a page is loaded. It can be located on any server that the Yellowfin service can access, but for best performance it would be hosted on the same server. In this example we have placed the file in the Yellowfin ROOT directory (Yellowfin\appserver\webapps\ROOT\header.jsp and can then be found via )に配置し、header.jspを介して見つかるようにしています。
注意:既存のYellowfinディレクトリを使用せずに、YellowfinNote: instead of using the existing Yellowfin directories, you may wish to create a new folder in Yellowfin\appserver\webapps\ROOT to contain your custom files, to make locating them easier.
Example
内に新しいフォルダーを作成してカスタムファイルを格納し、これらのファイルを簡単に特定できるようにすることも可能です。
例
コンポーネント | 標準 | カスタム |
|---|---|---|
ページ全体 | ||
Component | Standard | Custom |
Full Page |
|
|
| horizontalrule |
|---|
| Styleclass | ||
|---|---|---|
| ||