Page History
...
| Table of Contents | ||
|---|---|---|
|
...
概要
| Styleclass | ||
|---|---|---|
| ||
Once the required translation options have been configured, you are able to begin translating User Entered text. There are two options to accomplish this:
- Translate all content at once. This will allow you to provide translations across Views, Reports, and Dashboards in one CSV file.
- Translate individual components as required. This allows you to translate a View, Dashboard Tab, or Report, independently of other content. This is useful when you need to make changes to limited text and do not wish to go through the larger CSV file.
...
必要な翻訳オプションを設定すると、ユーザーが入力したテキストの翻訳を開始できます。これを実行する2つのオプションがあります:
- すべてのコンテンツを一度に翻訳します。これにより、ビュー、レポート、ダッシュボードにわたる翻訳を1つのCSVファイルで提供できます。
- 必要に応じて個々のコンポーネントを翻訳します。これにより、他のコンテンツとは関係なくビュー、ダッシュボードタブまたはレポートを翻訳できます。この方法は、限定されたテキストに変更を加える必要があり、処理するCSVファイルのサイズが大きくならないようにしたい場合に有効です。
システム全体でのコンテンツの翻訳
| Styleclass | ||
|---|---|---|
| ||
To set up translated content, you will need to have completed the Translation Configuration options outlined in the previous section. You will then need to follow these steps:
翻訳されたコンテンツを設定するには、前のセクションで概説した翻訳の設定オプションを完了しておく必要があります。その後、次の手順を実行する必要があります:
- 翻訳するすべてのコンテンツが「有効化」されていることを確認します。翻訳プロセスには「ドラフト(編集中)」のコンテンツは含まれません。
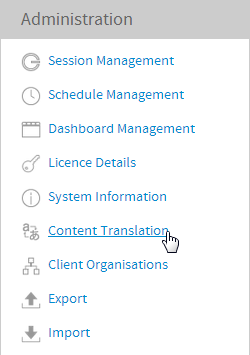
- 「管理」>「管理コンソール」>「コンテンツの翻訳」に移動します。
- 「開始」ボタンをクリックします。

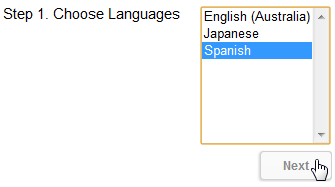
- 事前に設定した一覧から翻訳する言語を選択します。
注意: このプロセスを終わらせるときはいつも使用可能なすべての言語に翻訳する必要があるわけではありません。その時点で必要な言語だけで構いません。
「次へ」ボタンをクリックします。これにより、次の手順で説明するコンテンツグリッドが生成されます。 - 翻訳するコンテンツを選択します。次のオプションがあります:
- すべてエクスポート(「すべて」):すべての有効なビュー、レポートおよびダッシュボードの翻訳可能なコンテンツが含まれます。
- 変更されたコンテンツ(「変更済み」):前回の翻訳以降に変更済みとしてユーザーによってフラグ付けされた、すべての有効なビュー、レポートおよびダッシュボードの翻訳可能なコンテンツが含まれます。
- 選択した言語で翻訳されていないコンテンツ(「何もなし」): 選択した言語に翻訳されていない、すべての有効なビュー、レポートおよびダッシュボードの翻訳可能なコンテンツが含まれます。
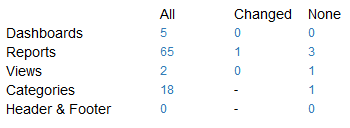
「すべて」、「変更済み」、または「何もなし」条件に一致する一意のコンテンツの数を示すコンテンツグリッドが表示されます。
コンテンツタイプごとに数が示されます:
ダッシュボード(ダッシュボードのカスタムテキスト)
レポート(レポートとグラフのカスタムテキスト)
ビュー(ビューとフィールドのカスタムテキスト)
カテゴリー(レポート、ビューおよびビューフィールドのカテゴリー)
ヘッダーとフッター(「システム構成」で定義された「ヘッダーとフッター」のデフォルトコンテンツ)
ここから、任意の数値をクリックすると、選択した個数を構成するコンテンツの内訳を表示できます。
注意: 複数の言語が選択され、「変更済み」とマークされた項目に1つ以上の選択した言語で翻訳値がない場合、これらの項目は「変更済み」ではなく「何もなし」に表示されます。
- 「エクスポート」ボタンをクリックして翻訳CSVを生成します。標準のブラウザー設定に従い、ファイルを保存し開きます。

- この翻訳CSVには、4つの標準カラム(UUID、Text Type、KeyおよびOriginal Text)と、翻訳のために選択した言語ごとに1つずつのカラムがあります。
翻訳を提供するためには、標準カラムが未変更のままで、すべての翻訳が適切な言語カラムに入力されていることを確認する必要があります。
注意: CSVの構造を変更するとインポートできなくなります。 - 翻訳が完了したら、CSVをYellowfinにインポートし直す必要があります。「コンテンツの翻訳」ページからすでに移動している場合は、「管理」>「管理コンソール」>「コンテンツの翻訳」から同ページに移動します。
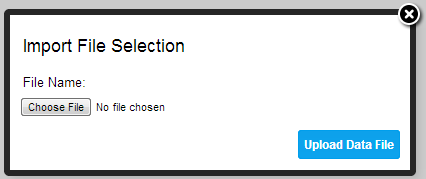
- 「インポート」ボタンをクリックします。

- 翻訳されたCSVを検索し、「データファイルのアップロード」ボタンをクリックします。
- ここで、次のいずれかの状況に応じた検証メッセージが表示されます。
- 翻訳CSVが正常にアップロードされた場合

- CSVファイル内にエラーがあるか、サポートされていないファイルタイプが使用された場合

- 変更された言語カラムヘッダーのいずれかがサポートされていない場合。下の例では、en_auが有効な言語コードでないaustralianに変更されていました。

- 標準(最初の4つ)のカラムの順序が変更されたか、言語カラムがない場合

- CSVファイルが空であったか、ファイルが選択されなかった場合
- 翻訳CSVが正常にアップロードされた場合
- Ensure all content you wish to translate is Active; the Translation process will not include Draft content.
- Navigate to Administration > General > Content Translation
- Click on the Begin button
- Select the languages you wish to translate from the list configured previously.
Note: you do not have to translate all available languages every time you complete this process, just whichever are required at the time.
Click on the Next button. This will generate the content grid discussed in the next step. - Select the content you wish to translate. You will be provided with the following options:
- Export All (All): includes translatable content across all active Views, Reports, and Dashboards.
- Content that has Changed (Changed): includes translatable content across all active Views, Reports, and Dashboards that have been flagged by the user as Changed since their last translation
- Content with no Selected Language (None): includes translatable content across all active Views, Reports, and Dashboards that do not have translations for the selected language.
You will also be shown a content grid which displays a count of unique content that matches the All, Changed, or None criteria.
There is a count for each type of content;
Dashboards (Dashboard custom text),
Reports (Report and Chart custom text),
Views (View and Field custom text),
Categories (Report, View, and View Field Categories), and
Header & Footer (Default Header & Footer content defined in Configuration)
From here, you can click on any of the figures to see a breakdown of the content that makes up the selected count.
Note: if multiple languages are selected, and items marked as Changed also have no translation values for at least one of the selected languages, then these items will be displayed in None, rather than Changed.
- Click on the Export button to generate your Translation CSV. Follow standard browser settings to save and open the file.
- You will now have a Translation CSV that contains 4 standard columns (UUID, Text Type, Key, and Original Text), and then a column for each of the languages you selected to translate.
In order to provide translations you will need to ensure the standard columns remain unchanged, and all translations are entered into the appropriate language column.
Note: making changes to the structure of the CSV will mean that the import will fail. - Once the translation is complete you will need to import your CSV back into Yellowfin. If you have moved away from the Content Translation page, navigate to it through Administration > General > Content Translation.
- Click on the Import button
- Locate your translated CSV and click the Upload Data File button.
- Yellowfin will now display one of the following validation messages when
- Your translation CSV upload is successful
- There is an error in your CSV file, or an unsupported file type was used
- One of the language column headers was changed and is not supported, in the example below en_au was changed to australian which is not a valid language code
- Either the order of the standard (first four) columns has been altered or there is no language column
- The CSV file was empty, or no file was selected
- Your translation CSV upload is successful
| horizontalrule |
|---|
| Styleclass | ||
|---|---|---|
| ||