Page History
...
| Table of Contents | ||
|---|---|---|
|
...
概要
| Styleclass | ||
|---|---|---|
| ||
Views within Yellowfin provide the link between users, their reports, and the database. The purpose of the view is to simplify the knowledge required by end users of the source database. This section describes some of the basic view management options available to you.
- To create a new view:
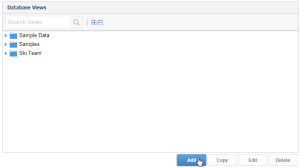
- click the add view link from within the source record, OR
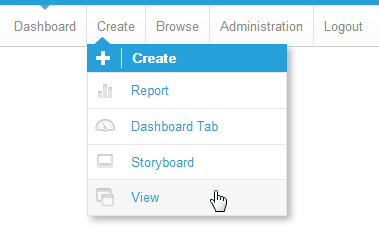
- click on the Create menu in the main navigation bar and select View
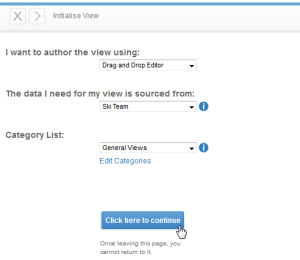
The view initiate page will prompt a select of the type of view you wish to create and the data source connection to use. The choices you have are:Builder
Description
Use the Yellowfin builder to create a view on your database.
Use an SQL statement to create your view
Use to create a view which connect to multiple separate data sources and views.
Select an existing OLAP cube - you will not be able to add additional attributes to a cube.
The ability to create a view from existing stored procedures on you database.
- click the add view link from within the source record, OR
- Select a category for the view. This is used to limit the field item categories to an appropriate set. For example only Sales Related field categories will be displayed for a sales view.
- To create a new category click the create category link. This will open a popup window in which you can add a new category.
...
Yellowfinのビューは、ユーザー、ユーザーのレポート、およびデータベースの間を結び付けます。ビューの目的はエンドユーザーが専門的な知識を必要とせずにソースデータベースを使えるようにすることです。このセクションでは、基本的なビュー管理オプションのいくつかを解説します。
- 新規ビューを作成するには、以下のステップを実行します:
- 「データベースビュー」画面で「ビュー追加」をクリックします。または
- メインナビゲーションバーの「作成」メニューをクリックして、「ビュー」を選択します。
「ビューの初期化」ページでは、ビューの作成方法や接続するデータソースの選択を行います。選択肢の意味は以下の通りです:作成方法
説明
作成に、Yellowfinのビュービルダーを使用します。
作成に、SQLエディターを使用します。
複数のデータベースに接続するビューを作成する場合に使用します。
既存のOLAPキューブを選択します。新たな属性を加えることはできません。
データベースに実行されている既存のプロシジャーからビューを作ることができます。
- 「データベースビュー」画面で「ビュー追加」をクリックします。または
- ビューのカテゴリーを選択してください。このカテゴリーは、フィールドのカテゴリーを限定するのに用いられます。たとえば、販売ビューには、販売関連カテゴリーのフィールドだけが表示されるようにします。
- 新しいカテゴリーを作成するには、「カテゴリーの編集」をクリックします。新しいカテゴリーを追加するためのウインドウが開きます。
ドラッグ&ドロップで作成
| Styleclass | ||
|---|---|---|
| ||
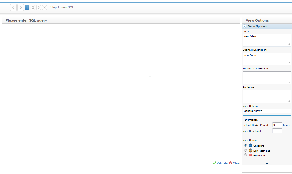
This option allows you to use Yellowfin to simply join multiple tables from a single selected database through a web interface.
See Drag & Drop View Builder for more information.
...
Yellowfinのウェブインターフェースにより、データベース内の複数のテーブルを簡単に結合することができます。
詳細については、 ドラッグ&ドロップビュービルダー を参照してください。
フリーハンドSQLビュー
| Styleclass | ||
|---|---|---|
| ||
「フリーハンドSQL」を選択すると、直接Yellowfinのリポジトリにビューを書き込むことができます。ソースシステム上の使用可能なテーブルは、左側の「データベーステーブル」に一覧表示されます。The freehand SQL option allows you write your own view directly into the Yellowfin repository. The tables available from the source system are displayed in the table list on the left hand side.
Note: When writing an SQL view it is very important that you do not include an order by - since results are sorted by the Java application not the database. The order by will cause your view to fail.
...
注意: SQLエディターを使用する際、結果はJavaアプリケーションでソートされますので、SQL文にはOrder by句などのソート命令を含めないようにしてください。ビューがうまく動作しない原因になります。
コンポジットビュー
| Styleclass | ||
|---|---|---|
| ||
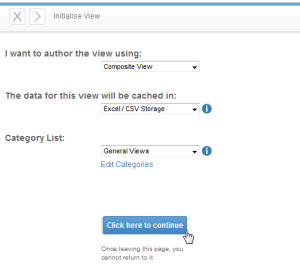
A composite view allows you to create a view which joins multiple data sources together. This allows users to create a report which includes data from these multiple databases.
The view builder for a composite view differs in that rather than displaying tables from a selected database it allows you to join existing Yellowfin views together and create virtual tables from any defined database.
- To create a composite view select the composite view option from the author drop down.
- You will also need to select a database in which you wish to store the view results. This is needed since composite views can be highly complex and result in slow query performance by your users. As a result Yellowfin schedules a query to generate the view and all its data on a regular basis to be stored in a specific warehouse database.
See View from Multiple Sources for information on creating composite views.
...
「コンポジットビュー」を選択すると、複数のデータソースを使うビューを作成することができます。これにより、ユーザーは複数のデータベースからのデータをレポートの作成に使用することができます。
コンポジットビューは、データベースから表示されるテーブルを選択するのではなく、いろいろなデータベースに対して作成された既存のYellowfinビューを結合して作成します。
- コンポジットビューを作成するには、ドロップダウンメニューから「コンポジットビュー」を選択します。
- 作成にあたっては、合成されたビューの保存先データベースも選択しなければなりません。これはコンポジットビューが非常に複雑になり、ユーザーからのクエリーに対する応答速度が遅くなるのを避けるためです。結果として、Yellowfinはクエリーをビューとそのすべてのデータをここで指定されたデータベースに保管するようスケジュールします。
コンポジットビューの作成については、 複数ソースからのビュー を参照してください。
OLAPキューブ
| Styleclass | ||
|---|---|---|
| ||
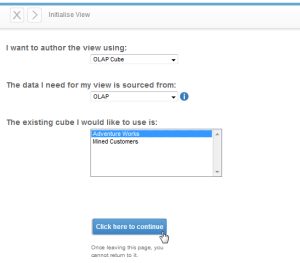
An OLAP cube is a pre-aggregated structure on your database. Like a data mart it already contains a set of dimensions and measures which have been pre-aggregated to support rapid reporting.
- To create an OLAP cube view select OLAP cube from the author drop down menu.
- Choose the source connection - Yellowfin will only provide OLAP source connections for you to choose from.
If no source exists you will have to create a specific OLAP source connection record. - Choose the cube from a list of available cubes.
Note: When creating an OLAP cube as a view you will have limited options for updating field information. This is because most of the metadata is already contained in the cube itself.
OLAPキューブは、データベース内にあらかじめ用意された多次元データモデルです。データマートがいい例ですが、迅速なレポートの実行のために最初から整理され「要約データ」として構築されユーザーに提供されます。
- OLAPキューブビューを作成するには、まずドロップダウンメニューから「OLAPキューブ」を選択します。
- 次にソース接続を選んでください。Yellowfinは、選択可能なOLAPソース接続のみを表示します。
ソース接続が表示されない場合には、まずOLAPをサポートしているデータベースへのソース接続を作成してください。 - 表示されるキューブの一覧から使用するキューブを選びます。
注意: OLAPキューブを使ってビューを作成する場合、フィールド情報の更新オプションが制限されます。これは、はじめからキューブ自身に必要なメタデータが含まれているからです。
ストアドプロシージャ
...
| Styleclass | ||
|---|---|---|
| ||
With Yellowfin you can connect to stored procedures running on your application database.
Yellowfinを使って、アプリケーションデータベース上で実行されるストアドプロシージャに接続することができます。
- ストアドプロシージャに接続するには、ドロップダウンメニューから「ストアドプロシージャ」を選択します。
- 接続したいデータベース、それに続いてそのデータベースで実行されるストアドプロシージャを選択してください。
- 「→」ボタンをクリックして、パラメーターページに進みます。Yellowfinは、あなたのストアドプロシージャの中に存在するパラメーターを自動的に見つけ出して一覧表示します。
- 各パラメーターの値を入力する必要があります。この値はビュービルダーのこのステージで目的のカラムを返すためだけに使われます(入力フィールドは、このビューから作成されるレポートに対する自動フィルターとして働きます)。
- パラメーターセクションへの入力が終わったら、フィールドの一覧を返すために「承認」をクリックしてください。
- 普通のビュー同様に、メタデータを定義してください。入力パラメーターがフィルターとして機能する点に注意が必要です。
- フィルターは、ストアドプロシージャから作成されるレポートに自動的に加えられます。それらはレポートデータページには表示されず、レポートフィルターページに表示されます。
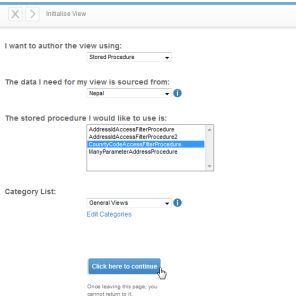
- To connect to a stored procedure select the stored procedure options from the create view drop down list.
- Select the Database and then the stored procedure you wish to connect to.
- Click the next arrow to continue to the stores procedure parameters page. Yellowfin will automatically detect parameters which exist in your stored procedure and display this list on the page.
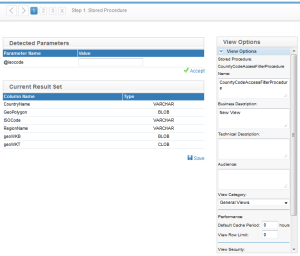
- You must fill in a value for each parameter. The value is only used to return column at this stage of the view builder. (The non-return fields will become automatic filters on the reports created from this stored procedure).
- When you have completed the parameter section click accept to return the list of fields in the result set.
- Complete the metadata as you would for a standard view. Note that the non-return parameters exist as filter fields.
- Filters will be added into each report created from the stored procedure automatically. They will not be visible on the report data page but will be displayed on the report filter page.
| horizontalrule |
|---|
| Styleclass | ||
|---|---|---|
| ||