Page History
...
| Table of Contents | ||
|---|---|---|
|
...
概要
| Styleclass | ||
|---|---|---|
| ||
Content Translation allows the system to provide User Entered reporting content across multiple languages by allowing users to translate content such as Report Names, Column Titles, Chart Labels, etc.
In order to enable multiple languages, the following process must be completed:
- Create content
- Define which languages should be supported in the system
- Enable Translation in Configuration & appropriate Role Permissions
- Export User Entered Text as a CSV
- Translate CSV for all required languages
- Import translations back into the system
- Allow users to change their preferred language through Browser settings or My Profile
- Maintain Translations
...
コンテンツの翻訳により、ユーザーがレポート名、カラムタイトル、グラフラベルなどのコンテンツを翻訳できるようにすることで、システムはユーザーが入力したレポートコンテンツを複数の言語で提供できます。
複数の言語を有効にするためには、次のプロセスを完了する必要があります:
- コンテンツを作成します。
- システムでサポートする必要のある言語を定義します。
- 設定および適切なロール権限において翻訳を有効にします。
- ユーザーが入力したテキストをCSVとしてエクスポートします。
- CSVをすべての必要な言語に翻訳します。
- 翻訳したものをシステムにインポートし直します。
- ユーザーが「ブラウザ」の設定または「プロフィール」を介して優先する言語を変更することを許可します。
- 翻訳をメンテナンスします。
コンテンツの翻訳の有効化
| Styleclass | ||
|---|---|---|
| ||
The following must be completed in order to use Content Translation in Yellowfin:
Yellowfinでコンテンツの翻訳を使用するには、次の手順を完了する必要があります:
- 次の手順でコンテンツの翻訳のロール権限を有効にする必要があります。
- 「管理」>「管理コンソール」>「ロール管理」に移動します。
- 翻訳のアクセス権を付与するロールを編集します。
- 「システム管理」>「コンテンツの翻訳」を有効にします。

- 変更内容を保存します。
注意: 新たに有効化された翻訳機能にアクセスするには、ログアウトしてから再度ログインする必要があります。
注意:これはユーザーがコンテンツを自身で翻訳するためにのみ必要で、翻訳されたコンテンツを表示するだけの場合はこのロール権限は必要ありません。
- 次の手順でシステムでサポートする言語を定義します。
- 「管理」>「システム構成」>「地域」タブに移動し、「言語設定」セクションを展開します。
- 「多言語展開」を「On」に設定します。
- 必要な言語を選択し「+」をクリックします。
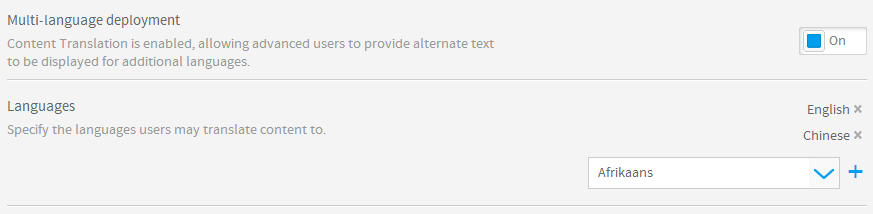
- これでサポートされる言語の一覧が表示されます。
- 「保存」をクリックして設定を更新します。
- The Translation Role Permission must be enabled by
- Navigating to Administration > General > Role Management
- Edit the Role(s) you wish to give Translation Access to
- Enable the Administration > Translate Content permission
- Save your changes
Note: in order to access the newly enabled Translation functionality, users will have to log out and then log in.
Note: this is only required in order for a user to translate content themselves, users do not require this role permission to merely view the translated content.
- Define the languages to be supported in the system by
- Navigating to Administration > Configuration > Regional Settings tab
- Set Multi-Language Deployment to Yes
- Click on the Add more languages link
- Select the required languages and click Add

- You should now have a list of supported languages.

- Click Save to update the settings.
| horizontalrule |
|---|
| Styleclass | ||
|---|---|---|
| ||